Shortcut Easy Apple Fritters for Busy Days & Snack Attacks
Gather ‘Round, This Shortcut Apple Fritters Recipe Is a Keeper
You ever get that itch for something sweet and fried (oh hi, comfort food!) but just don’t have the patience for all that dough rising, kneading, and waiting business? Me too! Actually, apple fritters were one of those things I thought you had to make from scratch until my neighbor Jill clued me in on this time-saving trick. Now? I bang these out at least once a month, usually when someone’s having a rough day or honestly, just because I see a couple apples getting squishy on the counter. My first batch looked… let’s say, rustic, but nobody complained (or left a crumb). Hey, food’s about taste anyway, right? Kind of like how my kid said they love the “lumpy” ones best. So, lumpy it is!
Why You’ll Actually Want to Make These
I make these shortcut easy apple fritters on evenings when dinner’s a bit of a disaster, and I just want to save face. My family goes absolutely nuts for them because they’re warm, sweet, and just the right amount of messy. Plus — confession — they’re my secret weapon for using up those wrinkled apples nobody wants (sometimes, I’ll sneak in a pear… shhh!). Don’t stress if the batter looks odd; mine often does. Originals taste better anyway. (And yes, cleaning up the oil splatter is less fun. But worth it!)
What You’ll Need (Plenty of Wiggle Room)
- 2 large apples (Granny Smith gives a tart kick, but sometimes I just grab whatever’s on hand. Gala or Fuji are great too.)
- 1 tube refrigerated biscuit dough (Buttermilk style if you want — honestly, the cheap store brand is fine!)
- 1 egg (I sometimes skip it — the dough holds, but egg adds richness)
- 1/3 cup milk (Whole, skim, almond — whatever’s in the fridge)
- 2 tbsp sugar (brown sugar gives a hint of caramel, just sayin’)
- 1 tsp cinnamon (My grandmother swore by Vietnamese cinnamon. I use whatever I find first.)
- 1/4 tsp salt (I’ve left it out once. Wasn’t the end of the world.)
- Oil for frying (vegetable or canola, but I once used sunflower in a pinch)
- Optional: a dash of nutmeg or ginger if you’re feeling spicy
- For glaze: 1/2 cup powdered sugar, plus 1-2 tbsp milk or OJ

How To (Sort of) Make Apple Fritters
- Dice your apples. Not too big; not too small. About the size of a sugar cube is my lazy method. Peel if you must, but I barely bother. Toss in cinnamon and sugar if you want more flavor.
- Chop up the biscuit dough into rough chunks. No need for uniformity — chaos is your friend here. Dump in a mixing bowl with the apples.
-
Mix egg and milk together, then pour over your apple-dough blend. Stir with a spoon or (let’s be real) your hand.
Side note: This is where I usually sneak a bite of apple. Totally worth it. - Heat oil in a deep pan. Medium-high, but not smoking! Drop a tiny bit of dough in to test — if it sizzles, you’re good.
- Scoop clumps (a big spoonful or your hand, no judgment) and carefully lower into the oil. Flatten slightly with a spatula or fork; helps it cook evenly. Fry 2–3 min per side til golden brown — they puff up like magic. Don’t pack the pan; these critters need space.
- Drain on paper towels. OR, I sometimes use that odd tea towel Aunt May gave me. Just don’t burn yourself here…
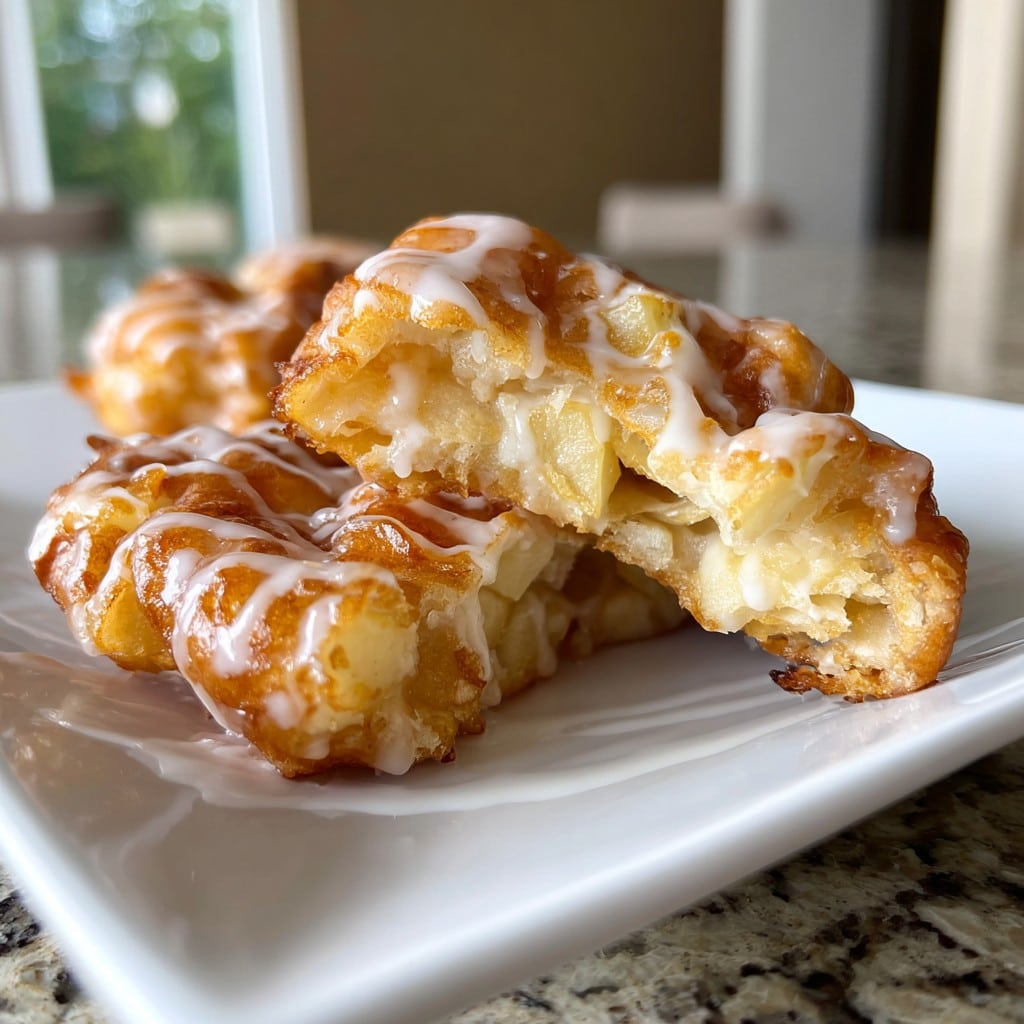
- Mix up the glaze: Whisk together powdered sugar and milk (or OJ — trust me, it’s tangy-good). Drizzle over fritters while they’re still warm. Or dip, if you’re feeling extra.
Notes from a Messy Kitchen
- If the batter feels dry, add a splash more milk. Or actually, I find a smidge of melted butter gives it a bakery flair.
- I sometimes forget the salt. It’s still tasty but kind of flat. Then again, my husband never notices.
- Double the cinnamon if you want, but fair warning, once I overdid it and everyone thought it was a churro.

Variations I Brag (and Sometimes Apologize) About
- Chopped pears instead of apples? Very autumnal. (My kids said it was “fancy fritters” — wins points!)
- Adding a handful of toasted pecans is good, though they fell out of half the fritters. Oops.
- I once tried chocolate chips… it was a gooey, glorious trainwreck. Proceed at your own risk.
- If you’re gluten free, try these GF apple fritters from Celiac.com — haven’t tested, but they look promising!
What If I Don’t Own Every Gadget?
Honestly? I use my old cast iron skillet. If you don’t have one, any deep frying pan works. No thermometer? No problem. Just use the old bread test: drop in a cube and if it browns in 45-ish seconds, your oil’s ready. Some folks like using an air fryer — here’s a link — but I still like the old-fashioned crunch.

How Long Do These Last? (Not Long, Actually!)
Technically, you can store these in an airtight box for 2 days, but honestly, in my house it never lasts more than a day! If you somehow have leftovers, pop ’em in the oven at 300°F for 10 mins to crisp back up, or microwave if you just can’t wait. The glaze gets a little sticky, but that’s half the fun.
How We Always Serve ‘Em (And a Weird Family Tradition)
Hot, with glaze melting down the sides. Sometimes with a scoop of vanilla ice cream if it’s a birthday or just one of those “what the heck” nights. My uncle swears by eating these with a slice of sharp cheddar on top. I tried it once. Oddly satisfying, actually.
Pro Tips I Learned the Hard Way
- I once tried rushing the frying step — result was raw dough. Not pleasant. Fry patiently, friend!
- If you over-mix the dough, it gets tough. Just stir until combined, no need for a workout.
- Let the fritters rest a minute before diving in. Scalded tongues = cranky eaters.
FAQ (Just Stuff Folks Actually Ask Me…)
- Can I make these ahead? Sort of, but honestly, they’re best fresh. If you must, reheat in the oven as suggested above. The microwave makes them soft — not my favorite, but people do it.
- Can I bake instead of fry? Yes, but they come out more like apple-studded biscuits. Not bad, but you lose the crispy edges.
- Do I HAVE to use glaze? Nope! They’re plenty sweet without, but my kids consider glazing mandatory. Up to you.
- Help! My dough is sticky/messy/runny! It’s meant to be messy. Flour your hands — or just embrace the goo. On second thought, a little extra flour fixes most problems.
- What apples work best? I love Granny Smith for tartness, but truly — use what you’ve got. Red Delicious works in a pinch, but is a bit mealy.
- Is this recipe kid-friendly? For helping, sure… though the oil frying part is strictly an adult gig in my house!
One Last Thing (Or, Why You Should Make These Tonight)
Sometimes I overthink dessert, but honestly, these shortcut easy apple fritters remind me food’s meant to be fun and unfussy. Plus, if you mess them up, they’re still sweet and kind of addictive. Life’s too short for perfection — just enjoy ‘em with a grin. And maybe a smidge too much glaze.
Ingredients
- 1 can (16 oz) refrigerated biscuit dough
- 2 medium apples, peeled, cored, and diced
- 1/3 cup granulated sugar
- 1 tsp ground cinnamon
- 1/4 tsp ground nutmeg
- 1 cup powdered sugar
- 2 tbsp milk
- Vegetable oil, for frying
Instructions
-
1In a large bowl, combine diced apples, granulated sugar, cinnamon, and nutmeg. Mix well and set aside.
-
2Cut each biscuit into quarters. Add biscuit pieces to the apple mixture and gently mix until the dough is coated and apples are evenly distributed.
-
3Heat about 2 inches of vegetable oil in a deep skillet or Dutch oven to 350°F (175°C).
-
4Drop spoonfuls of the apple-biscuit mixture into the hot oil. Fry for 2–3 minutes per side or until golden brown and cooked through. Avoid overcrowding the pan.
-
5Remove fritters with a slotted spoon and drain on paper towels.
-
6Whisk together powdered sugar and milk until smooth. Drizzle glaze over warm fritters and serve.
Approximate Information for One Serving
Nutrition Disclaimers
Number of total servings shown is approximate. Actual number of servings will depend on your preferred portion sizes.
Nutritional values shown are general guidelines and reflect information for 1 serving using the ingredients listed, not including any optional ingredients. Actual macros may vary slightly depending on specific brands and types of ingredients used.
To determine the weight of one serving, prepare the recipe as instructed. Weigh the finished recipe, then divide the weight of the finished recipe (not including the weight of the container the food is in) by the desired number of servings. Result will be the weight of one serving.
Did you make this recipe?
Please consider Pinning it!!