Graveyard Dirt Cups – Easy Halloween Treat with Pudding & Oreo “Soil”
These Graveyard Dirt Cups Are My Halloween Shtick
Alright, so dirt cups are one of those things I swore I’d never make. Yet here we are—my nephew calls them ‘the treat with worms,’ and now… it’s basically my signature dish every October. Nothing like a big bowl of pudding to make you feel like a kid again! The first time I made these, I actually forgot the cookies (rookie move, I know). Ended up just eating pudding with some sad, lone gummy worms. But hey, live and learn. Now, I’ve nailed this one and wouldn’t dream of Halloween without them—even if I grumble when Oreos get crumbs everywhere.
Why I Keep Making These (And Why You’ll Love ’em)
I make this when I want to whip up something quick and silly for a crowd, or when the kids start chanting ‘worms and dirt!’ at me (which is less cute after the 12th time, frankly). My family goes crazy for this because they can “dig” their own cup—sometimes literally, if I don’t supervise closely enough. Oh, and if you try to get fancy with a different cookie, believe me, they will notice. I’ve been there—tried Milano cookies one year for ‘gravestones’ and was soundly mocked. Lesson learned.
Stuff You’ll Need (And What I Sometimes Swap)
- 1 box (about 3.9 oz) instant chocolate pudding mix (sometimes I use vanilla with a bit of black food coloring—tastes odd, but looks fun)
- 2 cups cold milk (any % works; I’ve even used almond milk when I ran out of regular, but it was a little thin)
- 1 package Oreo cookies, crushed (my grandmother swore by Hydrox, but honestly—grab whichever cookie’s on sale)
- Gummy worms—they make the graveyard, really
- 8 oz whipped topping (store-bought or homemade; I do both, depending on how ambitious I’m feeling… usually not very)
- Optional: Milano or Vienna Fingers for ‘gravestones’ (see above for my cautionary tale), candy pumpkins, or edible wafer bones
How I Throw It All Together (No Fuss Here)
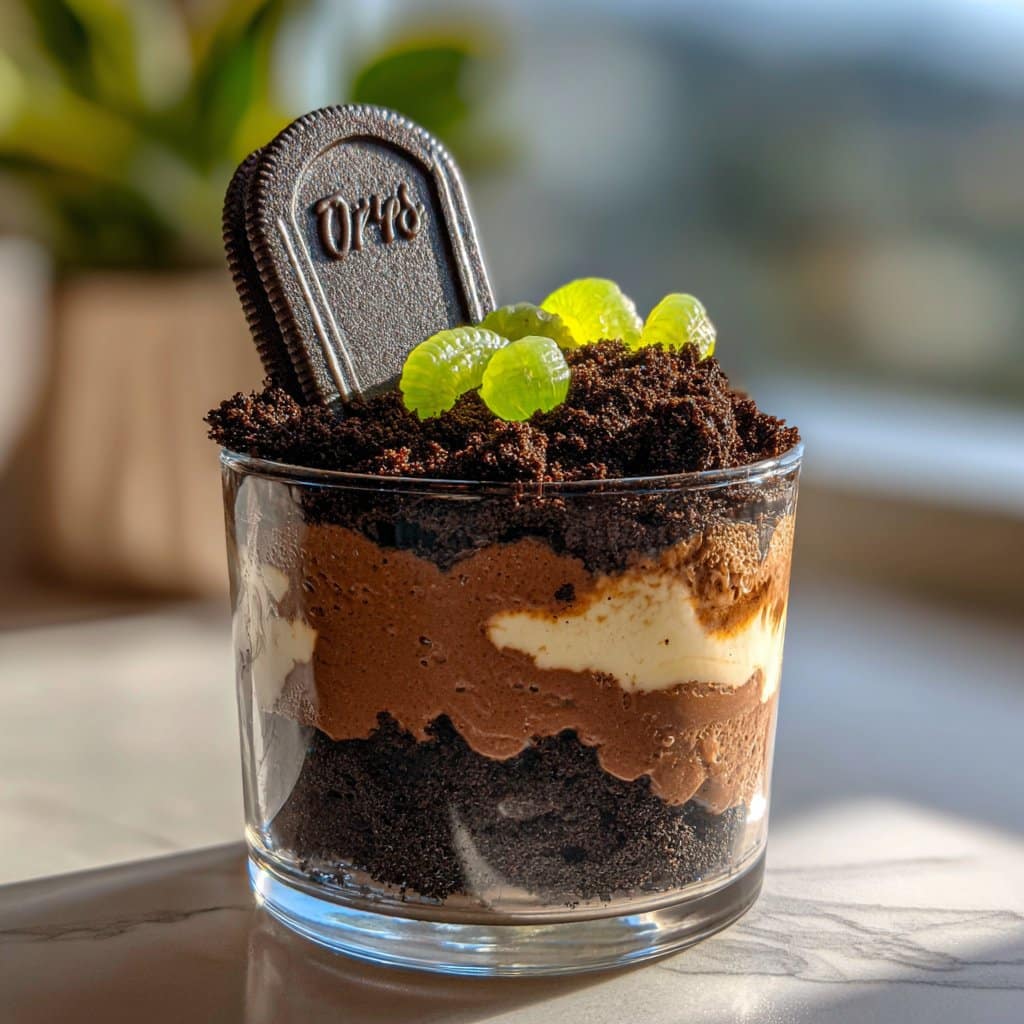
- First, I grab my pudding mix and dump it into a medium bowl. Pour in the milk and whisk like your life depends on it—honestly, 2 minutes is good. This is where I usually sneak a taste. It thickens fast, so don’t panic if it gets gloppy.
- Let the pudding sit for about 5 minutes. Don’t worry if it’s not set up like concrete—soft is perfect for this.
- Fold in the whipped topping gently. Or, if you’re me: more like plop-and-mix, trying not to deflate it totally. The color lightens a bunch. Looks slightly suspect at this stage, but hang in there.
- Now, bash up those Oreos—sometimes I just shove ’em in a big Ziploc and go to town with a rolling pin. If you don’t have one, the bottom of a mug or even your hands will do (messy, but sort of satisfying).
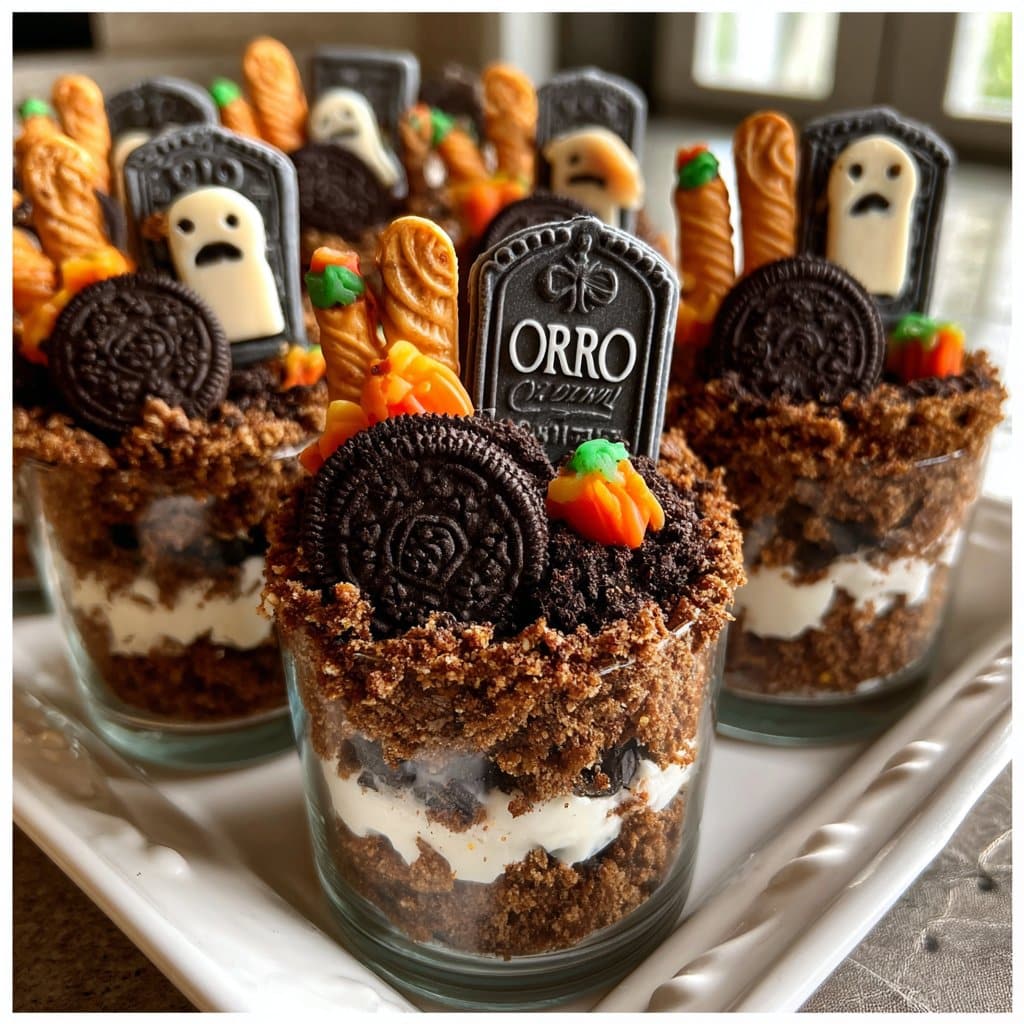
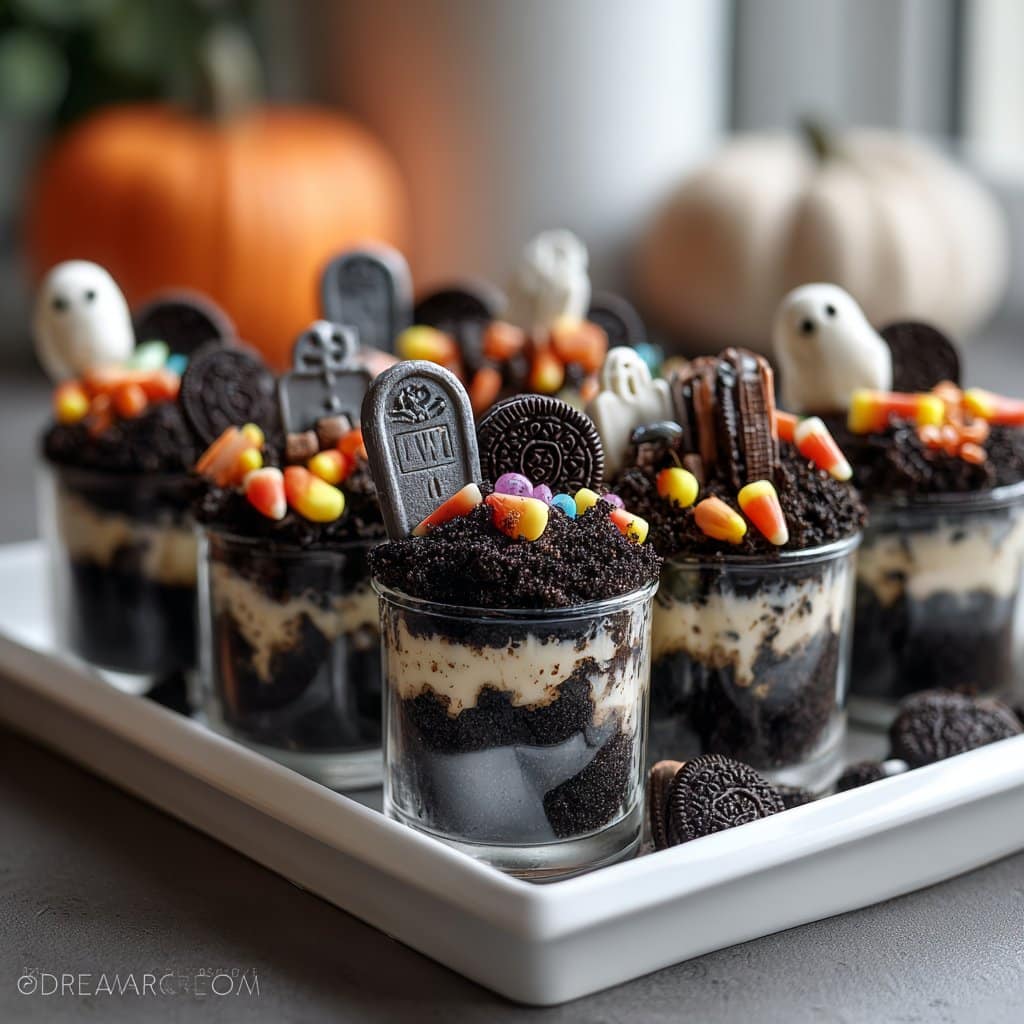
- Spoon a generous dollop of the creamy pudding into little clear cups. You can use Mason jars if you’re going Pinterest-style or even coffee mugs in a pinch.
- Sprinkle (read: dump) a handful of crushed Oreos on top, then stick the gummy worms halfway in so they’re “crawling” out. Kids love this bit.
- Add gravestone cookies, or whatever edible spooky bits you like. Just jam them gently into the mud—er, pudding.
And that’s about it. No need to overthink it—these are supposed to be messy.
Some Notes, Because I’ve Done This the Hard Way
- I once used homemade pudding and, honestly? Too much work for what you get. Instant is the way to go here. Unless you’re a pudding purist.
- If you don’t break up the cookies enough, you get awkward big chunks. After a few disasters, I now just blitz them in a food processor if I’m feeling fancy.

Things I’ve Tried That Might Shake Things Up—Or Flop
- I’ve added coconut “grass” dyed green with food coloring—looks cool but barely gets eaten. The kids pluck it off.
- Once tried using hot cocoa pudding mix. Tasted, well, weirdly chalky. Wouldn’t recommend.
- Sprinkles—sometimes festive, sometimes just messy. Proceed at your own risk.
What You’ll Need (But Don’t Stress If You Don’t Have It)
- Mixing bowl—you can use a big soup pot if all else fails (speaking from experience… long story)
- Whisk—fork also works, it just takes longer
- Ziploc bag & rolling pin (or mug, or wine bottle, or, let’s be real, fists)
- Clear cups or any smallish bowl
How To (Maybe) Store These—If You Even Need To
Cover tightly and keep in the fridge. Good for about 2 days, but honestly, in my house it never lasts more than a day! I actually think it tastes better the next day (something about the cookies going slightly soft—yum).
How We Serve and Dig Into These
Let folks top their own so they get exactly as many (or as few) worms as they want—my niece sure does. Sometimes we do a build-your-own-graveyard bar. It gets wild; watch out for flying cookie crumbs.
Some Lessons Learned—The Hard Way
- I once tried rushing the pudding—just pour-and-go—and regretted it because it turned out runny. Wait the 5 minutes, trust me.
- Crushing cookies with too much enthusiasm leads to cookie dust everywhere. Try a towel under your bag—and, yes, I forget every single year.
Q&A—Because People Always Ask Me These
Can I make these ahead? Yep! They’re even better the next day because the cookies get soft. Just don’t add the worms til serving—trust me, they get slimy after a night in the fridge.
What if I don’t have instant pudding? You could make it from scratch… but honestly, it’s a faff. A chocolate mousse packet works fine in a pinch. Or check out Sally’s homemade version if you’re feeling ambitious.
Can I use gluten-free cookies? Absolutely! I’ve swapped in these GF Oreos and they’re great.
Is it possible to double this? Oh yeah—just do the math, or more like eyeball it if that’s your style. I usually just keep dumping Oreos in until it “looks right.” Math was never my strong suit.
Do kids actually eat the gravestone cookies? Well, they bite ’em, lick off the pudding, then abandon them. Seems to be the tradition.
Quick unrelated interjection: has anyone else noticed that Halloween candy gets smaller every year? Maybe it’s just nostalgia talking, but man, back in my day those packets were hefty… Anyway, back to the dirt cups.
For more spooky snack inspo, check out Simply Recipes’ Halloween section. Or if you’re feeling really overachiever-y, try some DIY edible eyeballs (not for the faint-hearted, but pretty fantastic at a party).
Ingredients
- 1 package (3.9 oz) instant chocolate pudding mix
- 2 cups cold milk
- 12 Oreo cookies, crushed
- 1 cup whipped topping
- 6 gummy worms
- 6 oval-shaped cookies (like Milano), for tombstones
- Black decorating gel for writing
- 1/4 cup mini chocolate chips (optional)
Instructions
-
1In a large mixing bowl, whisk together the chocolate pudding mix and cold milk for 2 minutes until thickened.
-
2Let the pudding set for 5 minutes, then fold in the whipped topping to make it extra creamy.
-
3Spoon the pudding mixture evenly into 6 clear plastic cups.
-
4Sprinkle crushed Oreo cookies generously on top of each cup to resemble ‘dirt’.
-
5Write ‘RIP’ or spooky phrases on oval cookies using black decorating gel, then insert them into each cup as tombstones.
-
6Add gummy worms and mini chocolate chips as decorations. Serve chilled.
Approximate Information for One Serving
Nutrition Disclaimers
Number of total servings shown is approximate. Actual number of servings will depend on your preferred portion sizes.
Nutritional values shown are general guidelines and reflect information for 1 serving using the ingredients listed, not including any optional ingredients. Actual macros may vary slightly depending on specific brands and types of ingredients used.
To determine the weight of one serving, prepare the recipe as instructed. Weigh the finished recipe, then divide the weight of the finished recipe (not including the weight of the container the food is in) by the desired number of servings. Result will be the weight of one serving.
Did you make this recipe?
Please consider Pinning it!!