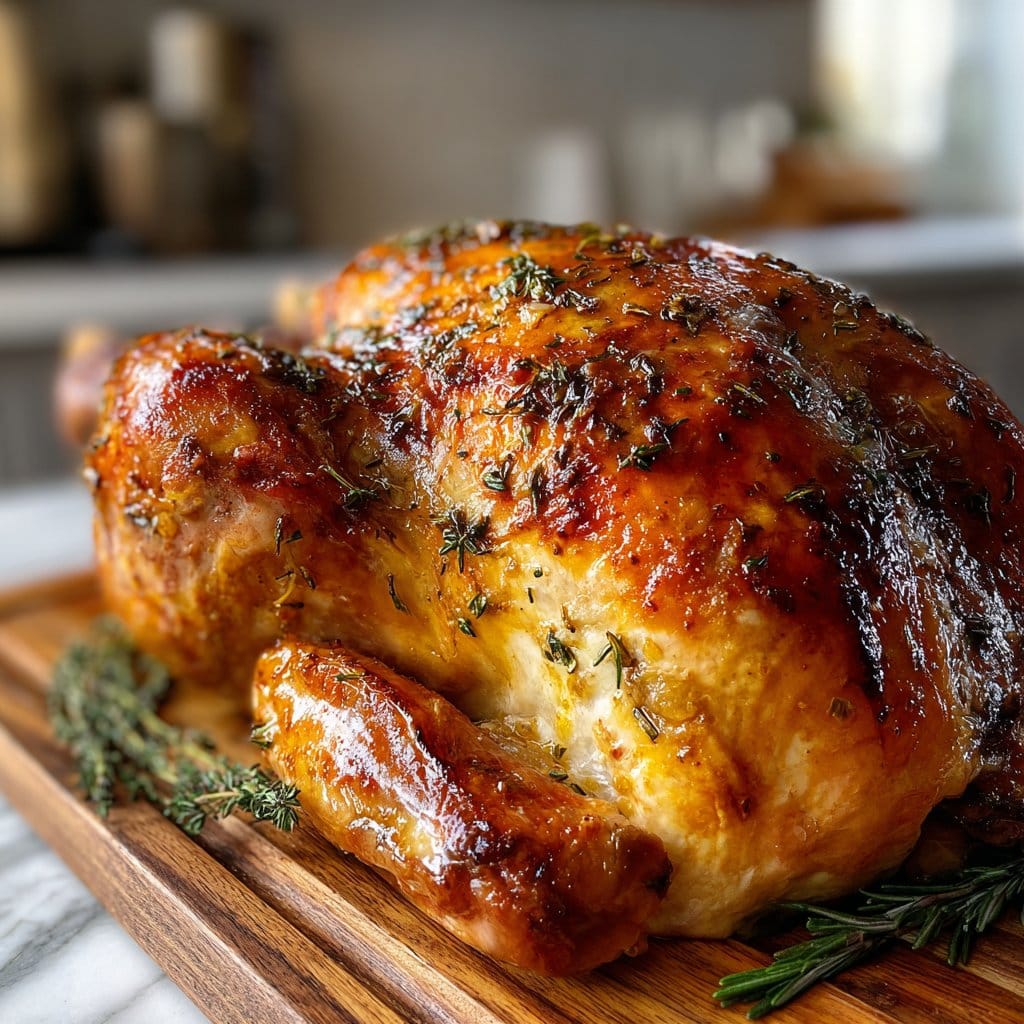
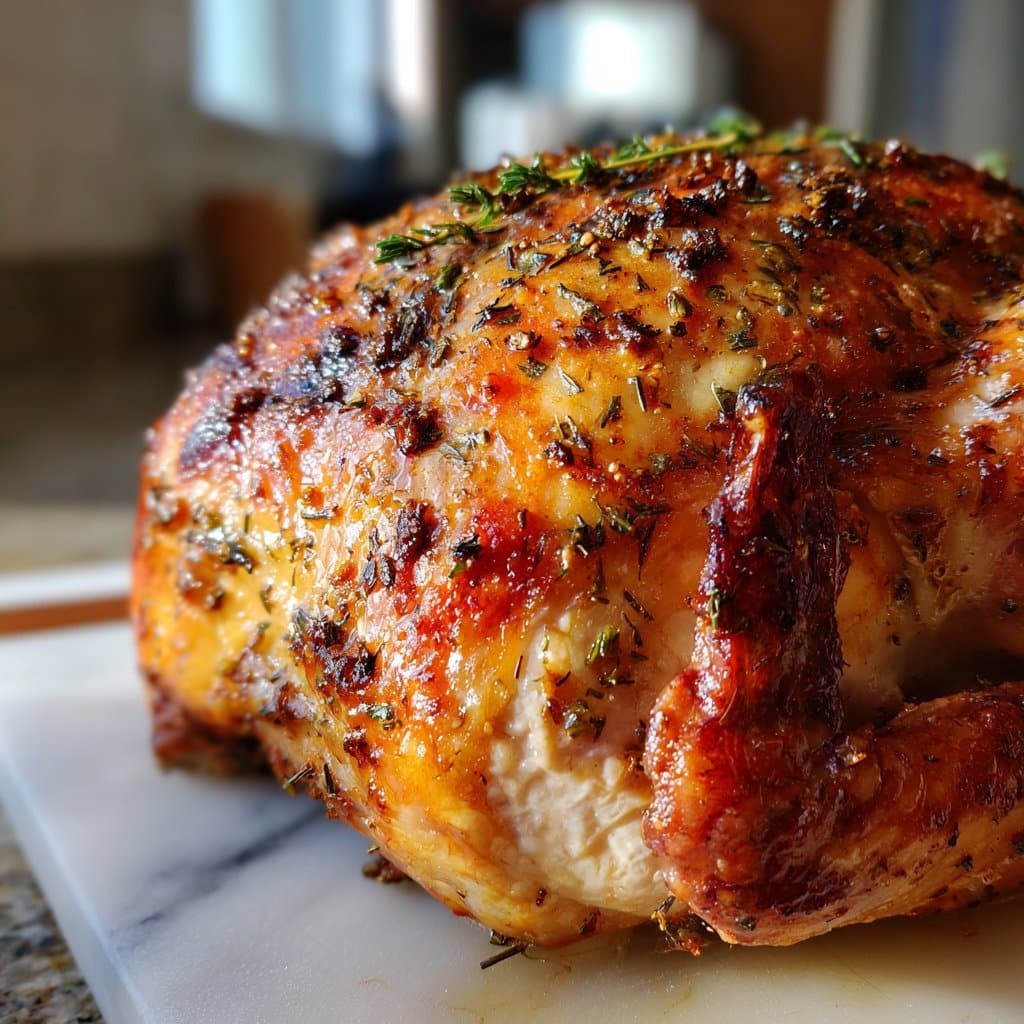
Perfect Roast Turkey – Juicy with Herb Butter Under the Skin
So, Here’s the Story With My Holiday Turkey
Okay, so you know that feeling when you’ve been nominated (volunteered as tribute, really) to bring the turkey to Thanksgiving or Christmas? Yeah, that’s me—except that one time Aunt May brought her ‘experimental’ brined turkey and, well, let’s just say some of us are scarred. After a couple of dry-bird disasters and a panic when I couldn’t find a basting brush (I ended up using a silicone pastry brush; not my finest hour but it worked), I finally cracked the code: slathering a herby, garlicky butter under the skin. Trust me, it sounds a bit fiddly, but it’s way easier than you think—and it keeps things super moist (ugh, sorry, but it’s true). Plus: gravy.
Why You’ll Love This — Or, At Least Why I Do
This is the turkey I make when I want my family to stop talking and start eating. (Honestly, peace and quiet for 3 minutes while everyone tucks in? Heaven.) There’s something about all that herby butter melting into the meat—everyone fights over the slices from the breast, for once. And hey, before I figured out the butter-under-the-skin magic, my turkeys always ended up kind of… bland? Not anymore. My uncle swears I secretly switched to rotisserie chicken once, but nope, it’s just butter and stubbornness.
The Ingredients List (And Some Substitutions)
- One whole turkey (around 12–14 lb, or whatever fits in your oven—I’ve squeezed in a 10 lb one before and it was fine)
- 1 cup (2 sticks) unsalted butter, room temp (I sometimes cheat with salted butter; my brother claims it tastes saltier, but I can’t tell)
- A big handful of fresh herbs (my go-to: parsley, thyme, rosemary. But sage is lovely, or just use whatever looks perky at the store. I’ve even subbed in a little tarragon once, not bad!)
- 4–5 garlic cloves, smashed or minced (or honestly, use that pre-minced garlic from a jar if you’re in a hurry; I won’t tell!)
- 1 lemon, zested and quartered
- Salt and freshly cracked black pepper to taste (my grandma swore by Kosher salt, but any will do, especially if that’s all you’ve got)
- Optional: 1 onion and 2 carrots, roughly chopped (they make the pan juices tastier for gravy)
- A glug of olive oil, for rubbing
- Chicken or turkey stock for basting, maybe 2 cups (but I’ve totally subbed in water before when I forgot to buy stock, and it wasn’t the end of the world)
How I Actually Roast This Turkey
- Prep the bird: First, clear enough space in your fridge for the turkey (learned that the hard way). Remove the giblets—don’t forget, they love to hide in both ends. I pat the turkey dry with paper towels until it’s about as dry as a British sense of humor.
- Butter party: In a bowl, mash together your butter, chopped herbs, garlic, lemon zest, a big pinch of salt, and black pepper. Sometimes I add a squeese of lemon juice if the lemons are extra nice, but it’s not essential.
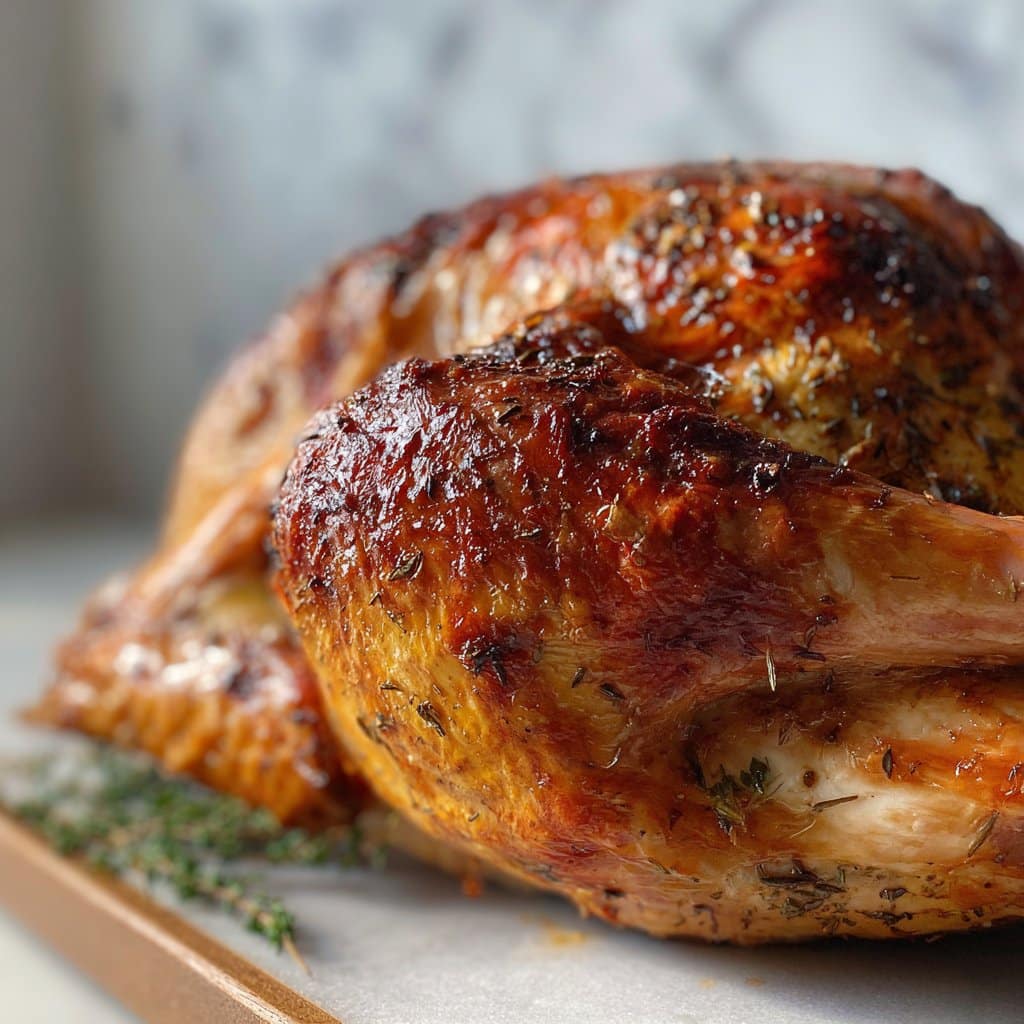
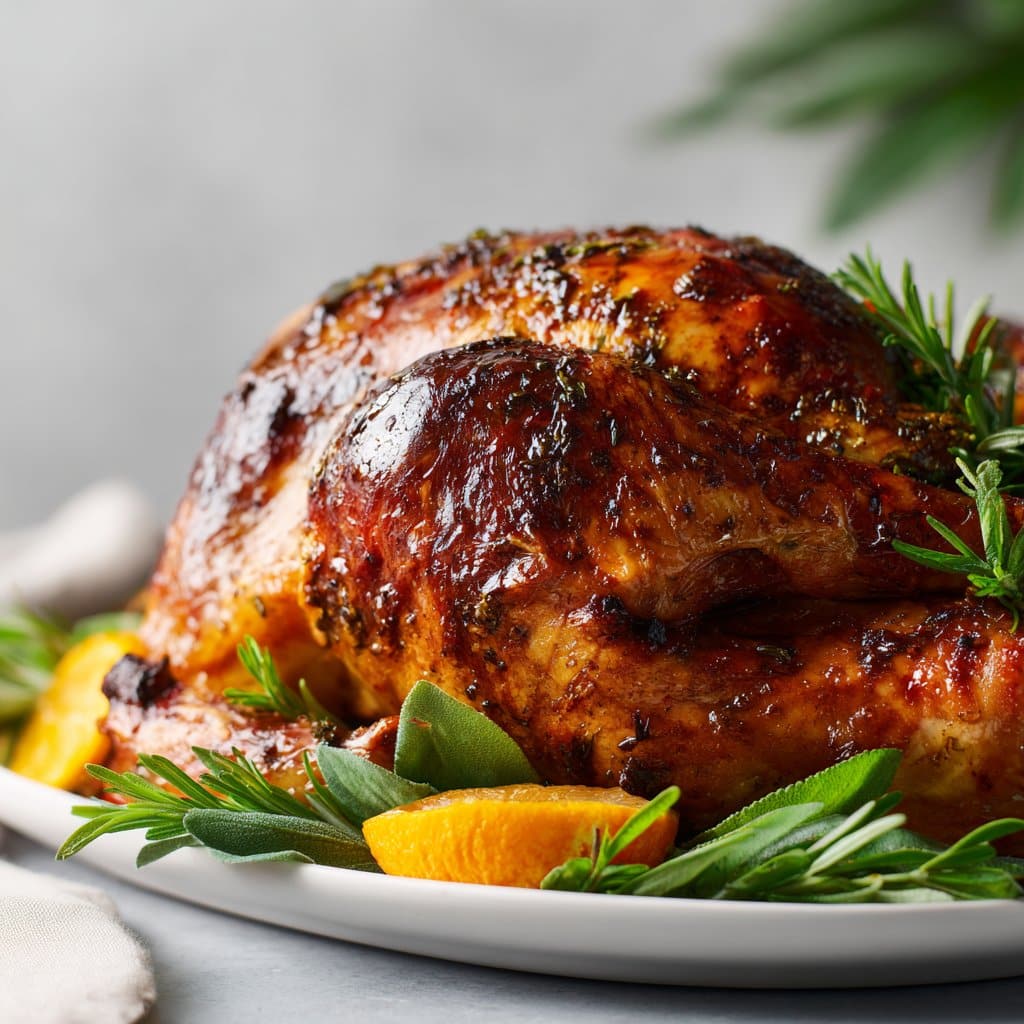
- Get under the skin: Gently work your fingers under the skin over the breasts—it feels a bit weird, like you’re putting on oven mitts backwards, but it gets easier fast. Squidge (that’s a technical term, right?) half of your herb butter under the skin, massaging it in. Smear the rest all over the outside, including the legs and wings. Some always sticks to my hands (and, let’s be real, some gets taste-tested).
- Stuff (sort of): Throw the lemon quarters and onion chunks inside the cavity. I don’t really bother with fancy stuffing anymore—it makes the meat unevenly cooked, in my experience.
- In the roaster: Place the turkey on a rack in a roasting pan. Toss carrots and extra onions in the bottom if using. Drizzle a bit of olive oil over the skin, then sprinkle some more salt and pepper. This is the point where I usually remember to preheat the oven: 325°F (165°C) is my standard.
- Roast, relax, and baste: Into the oven it goes—about 13 minutes per pound, roughly. But, and here’s the fun, check it after an hour. Pour a little stock or water in the bottom if the pan juices are getting dry. Baste every 45 minutes, unless you forget (I do, all the time. Still delicious.) If you notice the skin’s getting too dark, tent some foil on top. I always think it looks a bit silly, like the turkey’s wearing a hat.
- Test for doneness: Use a meat thermometer in the thickest part of the breast; you’re aiming for 160°F (it creeps up more as it rests). Did I mention to let it rest? At least 30 minutes. I’ve skipped this before, and regretted it—the juices just vanish instead of soaking in.
Notes—A Few Things I Wish Someone Had Told Me
- The butter can be made days ahead, but you need it really soft to get under the skin—I’ve tried using cold butter once and, trust me, it’s a nightmare.
- If your turkey is bigger or smaller, really do the math on roasting time—I’ve miscalculated and had to microwave slices once (not recommended!).
- Gravy hack: use the carrot and onion ‘trivet’ as flavour-boosters for your pan sauce, then strain them out after.
Variations (And One Epic Flop)
- I once swapped half the butter for olive oil and it was surprisingly tasty—bit more rustic, not as rich, but good if you’re low on butter.
- Herb-wise, dill didn’t do it for me. Sort of clashed with the lemon. Wouldn’t repeat, though cilantro worked in a pinch when the parsley looked sad.
- I’ve added orange zest instead of lemon and the sweet, zingy flavor is a fun twist—worth a go if you like citrusy notes.
- Oh, and that time I tried brining the bird and then using the butter… too much saltiness, but, hey, live and learn.
What If You Don’t Have a Roasting Rack?
No worries! Turn a few carrots into logs and lay the turkey right on top of those in your pan. (Potatoes work too, if you’ve got some rolling around in the cupboard. I think my friend Max uses celery sticks, but they get floppy.) Or, a big wire cooling rack will do as long as it fits. Improvise, that’s what I always say.
Storage—As If There Are Leftovers
Technically, store carved turkey meat in a sealed container in the fridge, up to 3 days. (But let’s be honest, it’s gone by morning in my house. Cold turkey sandwiches: possibly my favorite midnight snack.)
How I Like to Serve This (Family Quirks Included)
Oh, this is simple. Stuffing on the side (out of the bird), potato mash, and cranberry sauce are non-negotiable. Sometimes I’ll roast some brussels sprouts if I’m feeling healthy-ish. My mum insists on making peas “for colour,” but frankly, I always forget until the end.
And, a nice glass of white (or ginger ale if my brother’s driving home). Gravy poured over everything. That’s the rule.
Pro Tips (AKA, Stuff I Messed Up So You Don’t Have To)
- Don’t skip resting the turkey—seriously, I was too eager one year, and the juice ended up all over the cutting board instead of the bird. Disaster.
- Go easy with salt if your butter is salted; it stacks up fast. I once overdid it and everyone drank way more water than wine (not a win).
- If basting feels tedious, don’t stress—it’s mostly to make you feel involved. Actually, sometimes I think less basting makes the skin crisper.
FAQ—Things I Get Asked All The Time
- Can I prep the turkey the night before? Yep! Slather on the butter, cover it, and stash it in the fridge. Actually, some say it helps the flavors meld. I just like getting a head start.
- Do I have to baste? Not really. (I forget, often.) Skin may be less glossy, but meat stays juicy from the butter anyway.
- How do I stop the turkey drying out? Butter under the skin is magic, but also, try not to overcook it. Use a meat thermometer. Don’t trust the pop-up timers—they’re dodgy at best.
- Does this work for other poultry? Oh yeah—tried it on a chicken once, just needed way less butter and shorter roasting time. Came out lovely.
- Where can I learn more about carving? There’s a great walkthrough on Serious Eats. Or honestly, YouTube is where I go if I want a refresher mid-cooking; just search “how to carve a turkey.”
- What if my turkey doesn’t fit in the oven? Oh, friend, I’ve been there. You can spatchcock it if you’re brave (there’s a good tutorial at Food Network). On second thought, maybe just get a smaller bird next time. Or bribe someone else to host, haha!
Note: Sometimes I get distracted halfway through carving and realize I’ve been nibbling more than slicing. Occupational hazard; don’t judge.
Ingredients
- 1 whole turkey (12-14 lbs), thawed
- 1/2 cup unsalted butter, softened
- 2 tablespoons fresh parsley, chopped
- 1 tablespoon fresh rosemary, chopped
- 1 tablespoon fresh thyme, chopped
- 4 cloves garlic, minced
- 2 teaspoons salt
- 1 teaspoon black pepper
- 1 lemon, halved
- 1 onion, quartered
Instructions
-
1Preheat oven to 325°F (163°C). Remove giblets from turkey and pat the turkey dry with paper towels.
-
2In a bowl, mix softened butter with parsley, rosemary, thyme, garlic, salt, and black pepper until combined.
-
3Carefully loosen the skin over the turkey breast with your fingers. Spread half of the herb butter under the skin, and the remaining butter over the outside of the turkey.
-
4Stuff the turkey cavity with lemon halves and onion quarters. Tie the legs together with kitchen twine.
-
5Place the turkey breast-side up on a rack in a roasting pan. Roast for 3 to 3.5 hours, basting occasionally with pan juices, until a meat thermometer inserted into the thickest part of the thigh reads 165°F (74°C).
-
6Let the turkey rest for at least 20 minutes before carving. Serve and enjoy.
Approximate Information for One Serving
Nutrition Disclaimers
Number of total servings shown is approximate. Actual number of servings will depend on your preferred portion sizes.
Nutritional values shown are general guidelines and reflect information for 1 serving using the ingredients listed, not including any optional ingredients. Actual macros may vary slightly depending on specific brands and types of ingredients used.
To determine the weight of one serving, prepare the recipe as instructed. Weigh the finished recipe, then divide the weight of the finished recipe (not including the weight of the container the food is in) by the desired number of servings. Result will be the weight of one serving.
Did you make this recipe?
Please consider Pinning it!!