Cheesy Garlic Bread Rolls – Easy Recipe for Dinner Ideas
Let Me Tell You About This Cheesy Garlic Bread Roll Situation…
Alright, so you know those nights when you’re just hungry and want something wildly comforting, but maybe you also want to impress the family (or yourself, honestly—zero judgment)? That’s basically when these Cheesy Garlic Bread Rolls come out of the oven at my place. I remember once making them at 11 pm on a Tuesday after a terribly dull work Zoom; somehow the memory is warmer than the bread itself (which is saying something). My brother still jokes he’d marry these rolls if it were legal, but hey, I keep baking them anyway. If nothing else, the smell alone will raise your neighbors’ eyebrows.
Why You’ll Probably Want to Make These (A Lot)
I whip these up whenever I want peace and quiet, because my family is busy chewing for a full five minutes (pure bliss). My partner will straight-up offer to do the dishes just to get at the first roll out of the oven—like, it’s that kind of situation. Even when I botched the dough once (turned out a bit tough, whoops), the melty cheese and garlic sort of smoothed over all the cracks, both literal and emotional, ha! Also, these rolls smell like you walked into a pizzeria, minus the noisy crowd or the TV blaring in the corner.
What You’ll Need (And My Lazy Substitutes)
- 250g plain flour (sometimes I use bread flour if it’s loitering at the back of my cupboard; honestly, any sort works for this)
- 1 packet (7g) instant yeast
- 1 tsp sugar
- Half teaspoon salt
- 150ml warm water (my gran always said ‘blood temperature’—go figure)
- 1.5 tbsp olive oil (I’ve made do with vegetable oil, but olive has more flavor, you know?)
- 2-3 cloves garlic, minced (or squeeze from those garlic paste tubes—shh, don’t tell anyone)
- 1 generous handful grated cheese (mozzarella is dreamy, but cheddar or even a rogue slice of gouda works in a pinch)
- 2 tbsp soft butter
- Optional: parsley, chives, or literally whatever looks green and hopeful in your fridge
How I Throw These Together (Don’t Overthink It)
- First up, in a massive bowl (or medium—no rules), mix your flour, yeast, sugar, and salt.
- Pour in the warm water and olive oil. Now, here’s where I’ll admit: I usually use a wooden spoon for about a minute, then ditch it and just use my hands. The dough should be slightly sticky, not concrete.
- Plonk it on a floured surface. Knead for like 5-7 minutes, or until it looks smooth and your arms are starting to mutter rude words at you. My dough never looks textbook at this stage, just—don’t fret.
- Pop it back in the bowl, cover (cling film, a damp tea towel, whatever’s handy), and leave it to puff up for 45 minutes or an hour, unless your kitchen’s Baltic—then maybe give it more time. I’ve rushed this, and yeah, the rolls were sad.
- Mix the butter and garlic together in a mug. Microwave 10 seconds so it’s spreadable. I sneak a fingerful here. For science.
- After the dough’s doubled (or at least looks hopeful), punch it down (gently, I suppose). Roll it into a rectangle. If yours is vaguely oval—join the club.
- Spread the garlicky butter all over. Sprinkle the cheese evenly (or heap it, no judgment). Add the herbs if you’re feeling fancy.
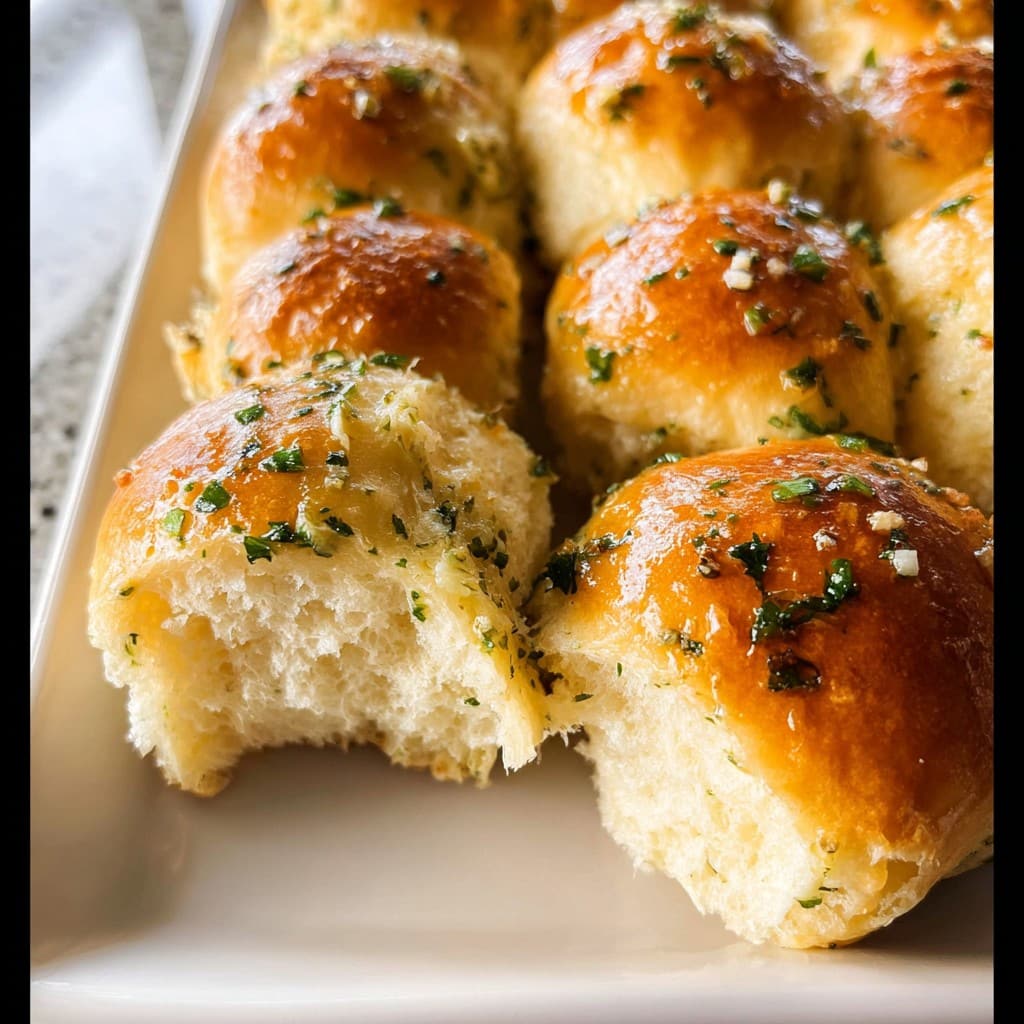
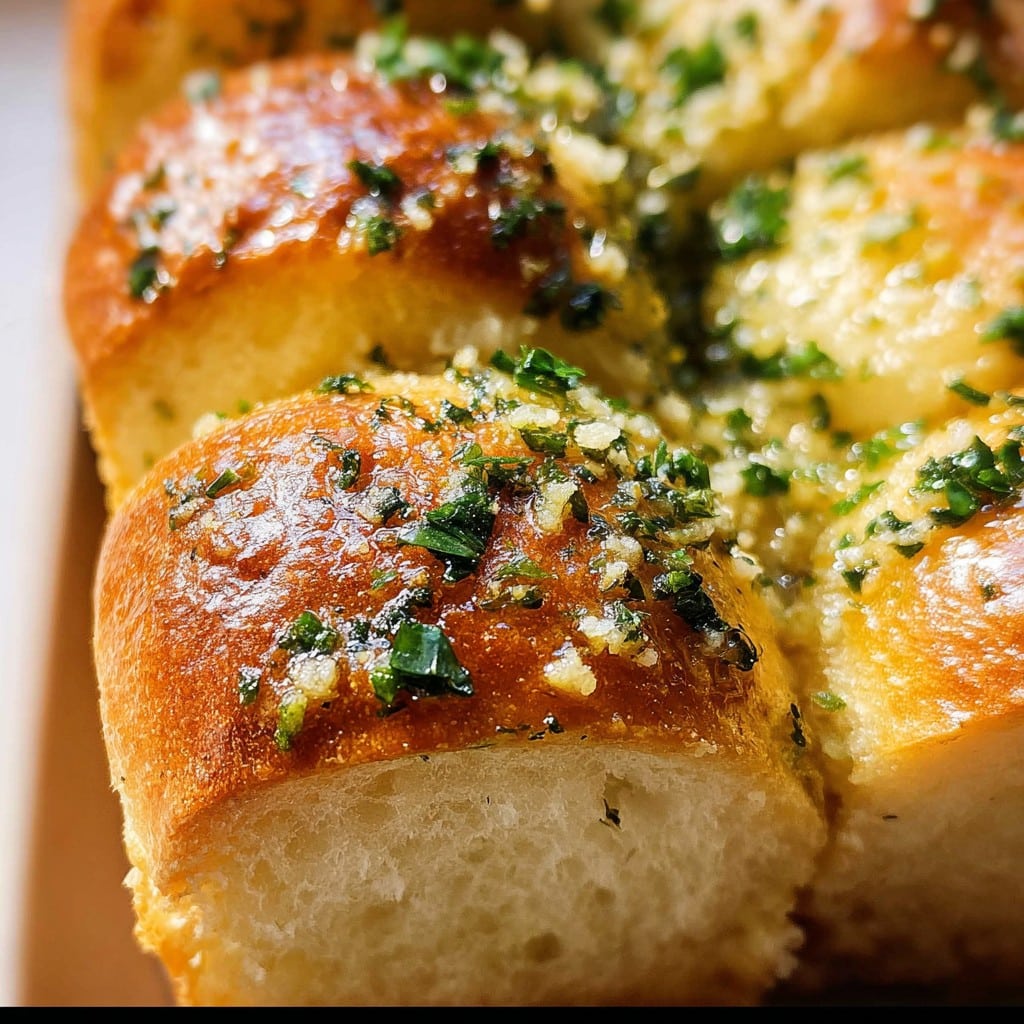
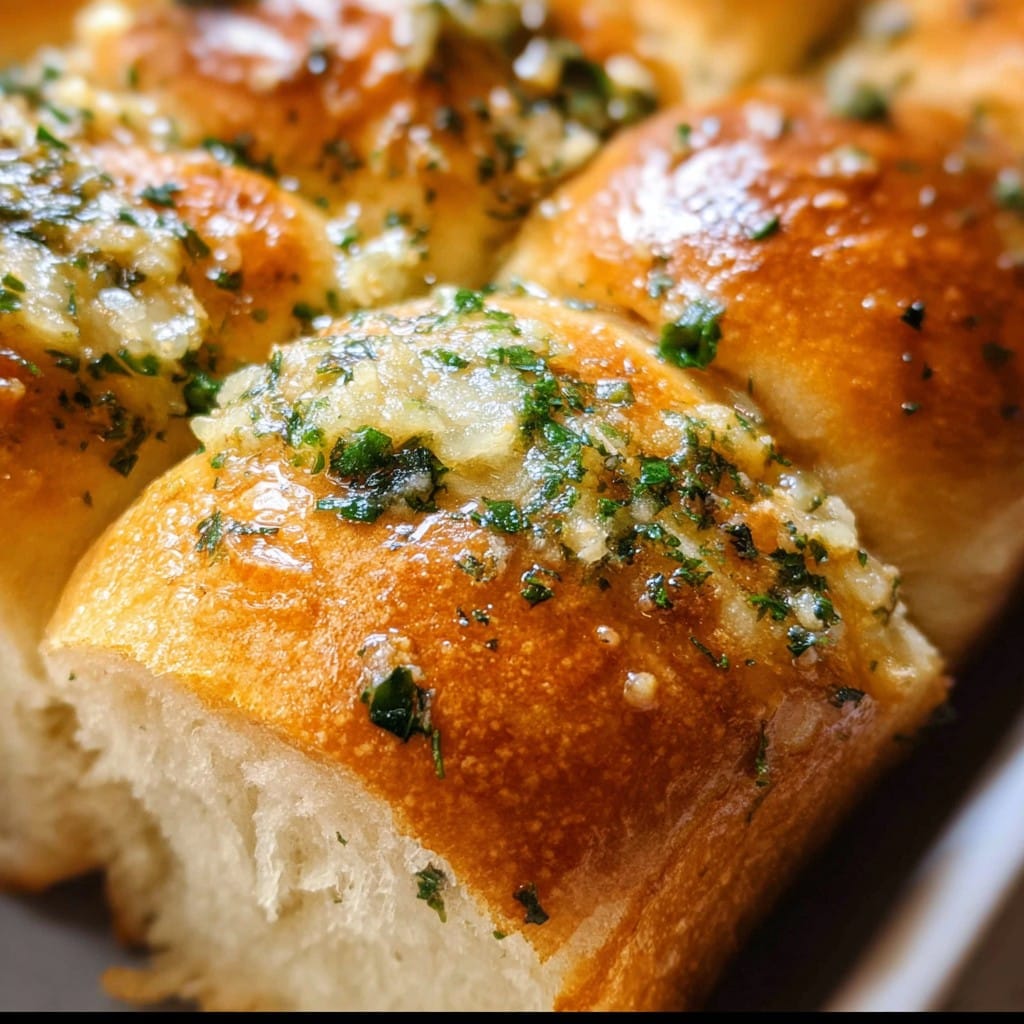
- Roll it up, like a Swiss roll. If yours cracks, don’t worry, cheese will glue it all together later. Slice into 8ish bits.
- Arrange in a buttered baking tin. Squish them in if needed—they like the company. Cover for 20 minutes while you put your feet up, or maybe read this guide on handling yeast dough if you’re feeling nerdy.
- Bake at 200°C (that’s 400°F for my American pals) for about 18-22 minutes, or till golden on top and maybe oozing cheese in places. I basically start hovering at the oven after 15 minutes (because, smells).
Bits I’ve Picked Up Along the Way (Take or Leave)
- If you use strong bread flour, the rolls are more… roll-y? But plain works fine. One time I tried self-raising by accident, and it was quite fluffy, but also weirdly fizzy?
- Melting your butter instead of just softening it makes a weird, soggy patch in the middle—stick to soft, trust me
- You can assemble these to the point before baking, then stick ‘em in the fridge for a few hours if you want them hot for dinner later

The Times I’ve Gone Off Script
- Added chopped jalapeños with the cheese—delicious, but my nephew said it was ‘spicy sabotage’ so maybe mild is best for crowds
- Subbed in feta. Actually, tasted very salty. Not my best idea. But if you love feta, go for it!
- One time, I brushed the tops with honey butter after baking. Slightly odd, but strangely more-ish
The Stuff You’ll Need (Or What I’ve Improv’d With)
- Baking tin (I use my old pyrex dish. Cookie sheet works too, but they’ll spread out more)
- Mixing bowl
- Rolling pin—Or, wine bottle in desperate moments. Actually, works surprisingly well.
- Grater for cheese (unless you pre-grate. Or buy it shredded—life’s too short sometimes)
Storing Leftovers (If That Ever Happens)
Keep these in an airtight tin for, theoretically, 2 days. But, you know, I’ve almost never actually needed to store them beyond an afternoon—the kids snaffle the last crumbs straight from the tin. They do freeze okay, but honestly, fresh is magic. If you want to revive them, a spritz of water and a zap in the oven works, though they lose their squishy magic a smidge.
How I Like to Serve Mine
These rolls on their own are already dinner in my book, but if you wanna be all proper, I serve them piled around a bowl of homemade tomato soup or even just with a big green salad when I’m pretending to be healthy. During winter, sometimes I add extra garlic and eat four before anyone else notices.
If I Could Time Travel: Pro Tips
- Seriously, don’t rush the rise—I tried baking early once, and the rolls were dense as bricks. Learn from my impatience!
- Scatter some flaky salt on top before baking—next-level vibes, even if my mum calls it ‘pretentious’
- Let the cheese cool a bit before tearing in, or you’ll redecorate your face with molten mozzarella (ask me how I know)
Your Questions, Answered (With Good Intentions)
- Can I make these ahead? Oh absolutely. Assemble, cover, and chill for up to 5 hours; bake when you’re ready. Actually, the flavor is a touch nicer if the dough rests longer.
- Can I skip the yeast? Well, you could try baking powder for a ‘quick’ bread—honestly, I think it tastes meh, but it bakes faster.
- Does vegan cheese work? I’ve used it for a friend’s dinner—worked fine, just, get the meltable kind. Some brands are better than others; check reviews like on Go Dairy Free.
- How spicy can I make these? Go wild, add chili flakes if you like. The basic dough is like a blank slate, really.
- Help, my dough won’t rise! Been there. Usually my yeast was too old. Try again with fresh stuff—or put the bowl somewhere warm, like near a radiator (or inside an off oven with the light on).
And if you’ve made it all the way down here reading (blimey!), I honestly hope these brighten up your evening—even if it’s just bread rolls for dinner. We all start somewhere and, on second thought, sometimes it’s the simplest things like these that make things feel just a bit cosier, regardless of the day you had.
Ingredients
- 2 cups all-purpose flour
- 2 teaspoons instant yeast
- 1 teaspoon sugar
- 1 teaspoon salt
- 3/4 cup warm milk
- 2 tablespoons unsalted butter (melted, plus more for brushing)
- 1 cup shredded mozzarella cheese
- 3 cloves garlic (minced)
- 2 tablespoons chopped fresh parsley
Instructions
-
1In a large bowl, combine flour, instant yeast, sugar, and salt. Mix well.
-
2Add warm milk and melted butter to the dry ingredients. Stir until a dough forms, then knead for 5-7 minutes until smooth.
-
3Divide dough into 8 portions. Flatten each piece, place some shredded mozzarella in the center, and seal to form a ball.
-
4Arrange the rolls on a lined baking sheet. Cover and let rise for 15 minutes.
-
5Mix remaining melted butter with minced garlic and chopped parsley. Brush over the rolls.
-
6Bake at 375°F (190°C) for 20-25 minutes or until golden brown and the cheese is melted inside. Serve warm.
Approximate Information for One Serving
Nutrition Disclaimers
Number of total servings shown is approximate. Actual number of servings will depend on your preferred portion sizes.
Nutritional values shown are general guidelines and reflect information for 1 serving using the ingredients listed, not including any optional ingredients. Actual macros may vary slightly depending on specific brands and types of ingredients used.
To determine the weight of one serving, prepare the recipe as instructed. Weigh the finished recipe, then divide the weight of the finished recipe (not including the weight of the container the food is in) by the desired number of servings. Result will be the weight of one serving.
Did you make this recipe?
Please consider Pinning it!!