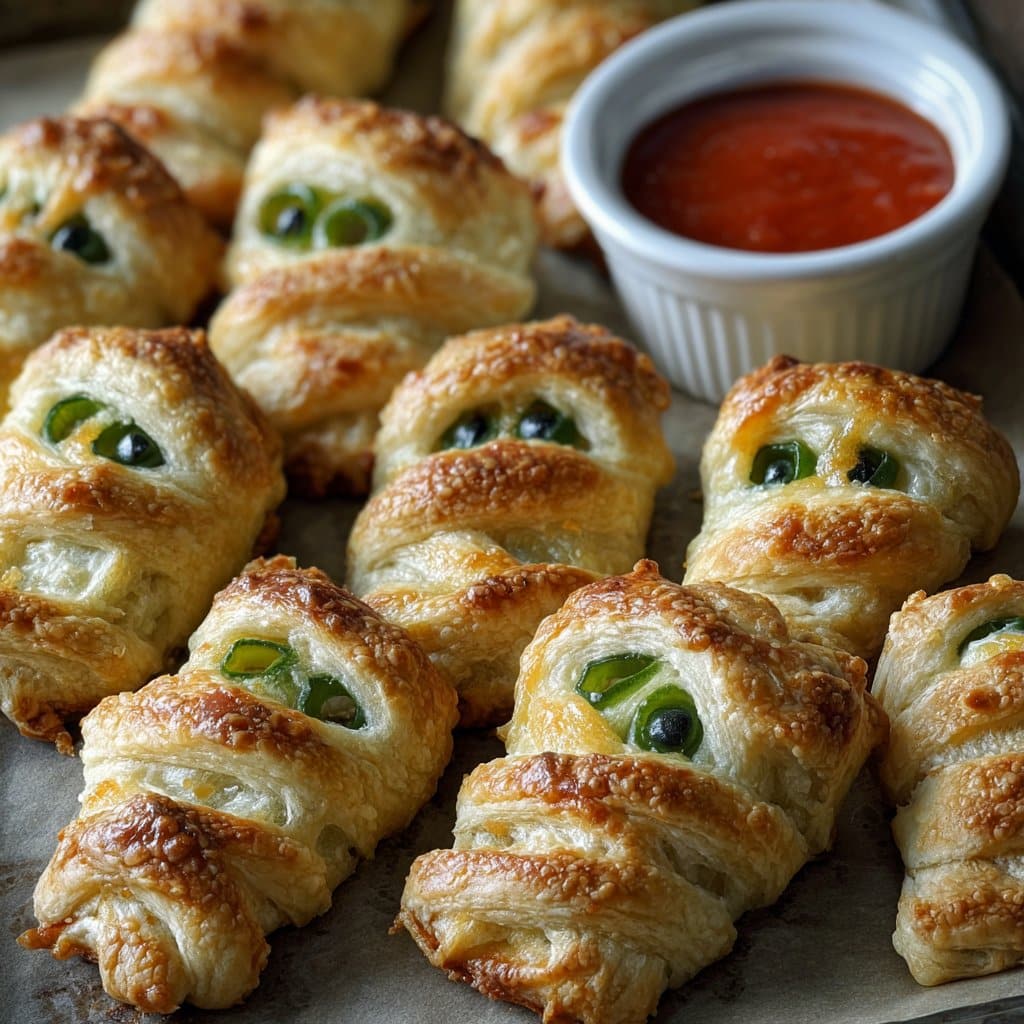
Jalapeño Mummies – Spooky & Spicy Halloween Appetizer
Spicy, Silly, and Oh-So-Addictive (Don’t Blame Me If They Vanish)
Every October, I start promising myself that I’ll do something low-effort for the Halloween party. And every October, I completely forget that promise and end up making a tray (okay, two) of these Jalapeño Mummies that my kids started calling “spooky peppers”—though last year, my neighbor Bob tried to eat one with the wrapper still on, so clearly not everyone got the memo. Honestly, it’s just not Halloween until someone pulls a “spicy mummy face,” you know? Oh, here’s a funny thing: the first time I made these, I accidentally used banana peppers. Let’s not dwell on that mistake.
Why I Keep Making Jalapeño Mummies (Despite the Occasional Cheese Explosion)
I make this recipe every Halloween because: A) they look hilarious on a spooky spread, B) my family goes nuts for them, and C) once you’ve tried a hot jalapeño wrapped up in flaky pastry—well, trust me, potato chips just can’t compete. My youngest claims he “hates anything green” but, lo and behold, these get demolished (and, yes, sometimes the cheese oozes out and makes ghostly shapes; weird, but we roll with it). Plus, you don’t need to be Martha Stewart to make these work; half the fun is when a mummy looks more like it had a rough night at the graveyard.
Ingredients (and Weird Little Substitutions I’ve Tried)
- 8-10 medium jalapeño peppers (I use whatever’s freshest at my local shop; serranos are a bit wild, but I’ve tried them in a pinch… with caution!)
- 200g cream cheese (Philadelphia is classic but honestly store brand tastes just fine)
- 100g shredded cheddar cheese (a “handful” works too; I sometimes toss in pepper jack for extra kick)
- 1 sheet ready-rolled puff pastry (You could use crescent dough if it’s all you’ve got. My grandma actually used pie crust once, and it was… weirdly good.)
- Olive oil for brushing (or melted butter, honestly whatever fat you have)
- 18-20 edible candy eyes (I’ve cut up olives, too, in desperate moments)
- Salt & cracked black pepper
- Optional: ¼ tsp garlic powder or your favorite spices (I’ve been known to sneak little bacon bits in, shh!)
How I Usually Throw These Together (Don’t Sweat the Details)
- Preheat your oven to 200°C (about 400°F); don’t make my mistake and forget to preheat—that turns “spooky” into “sad cold cheese.”
- Slice jalapeños in half lengthwise and scoop out the seeds. (Trust me, wear gloves. I once forgot and spent the rest of the night with jalapeño eyes—never again.)
- Mix the cream cheese, shredded cheese, salt, pepper, and whatever optional goodies you’ve got in a bowl. This is where I usually sneak a taste (for, you know, safety or something).
- Stuff the jalapeño halves with your creamy, cheesy filling. It won’t be neat, but that’s okay. These mummies are not models.
- Now, slice your pastry into ½-inch strips—honestly, I eyeball it. Wrap each filled jalapeño with the strips, leaving small gaps for those mummy eyes later on.
- Place ‘em on a lined baking tray, brush very lightly with olive oil (or melted butter), and pop in the oven for 15-20 minutes. Or until golden and a bit bubbly.
Don’t worry if cheese oozes out. That’s just inner mummy personality. - Once they’re out, add two candy (or olive) eyes to each. If the eyes slide off, wait a couple min—trust me, patience is worth it.
Stuff I Wish I’d Known (Notes from My Chaotic Kitchen)
- Those little edible eyes melt/burn if you add them before baking. Learned that the hard way—my “mummies” looked more like they were melting.
- If you prefer mild, soak jalapeños briefly in cold water after deseeding. Or don’t. We like a little drama at my parties.
- Puff pastry gets sticky in a hot kitchen—if it’s sticking to everything, pop it back in the fridge for a few mins.
Variations I’ve Actually Messed With (and a Frank Admission)
- I swapped the cheese filling out for hummus once; honestly, I wouldn’t do it again. Tasted like a confused appetizer.
- Pepper jack and bacon bits in the filling is dangerous (in a good way).
- Red bell peppers for a non-spicy crowd—my cousin’s kids called them “mummy boats.”
- Oh, and if you ever have leftover pulled pork—tiny bit inside? Chef’s kiss.
What If I Don’t Have (Insert Gadget Here)?
Look, I love my fancy silicon baking mat, but parchment paper or just plain ole tin foil, non-stick sprayed, does the trick too. No pastry brush? Use the back of a spoon for oil. Or, you know, your fingers—just embrace the mess.
Storing Jalapeño Mummies
Technically you can store these in an airtight tub in the fridge for up to 2 days, just reheat at 180°C if they get limp. But honestly, in my house they disappear within hours, so I don’t have much firsthand storage wisdom. I do think the leftovers taste better cold, but I realize that’s a minority opinion.
How We Serve ‘Em (and the Occasional Debate)
I always plop them on a tray lined with black napkins (my sister says it’s “goth picnic” vibes, but so what). Little bowls of ranch or sour cream for dipping is a tradition. One year, I added a skeleton hand prop, but then my uncle Jerry refused to eat any—it was “too realistic.” Honestly, whatever gets people talking.

Pro Tips, Aka: Things You’ll Regret Skipping
- Let these cool a bit before you add the eyes—or their faces melt, and you get “mummy meltdown.”
Yeah, I learned that the hard way. Twice. - Cutting the pastry strips too wide makes the mummies look like they’ve been mummified by a toddler. Actually, that’s okay, too—but, thinner strips do bake better.
- Take off your gloves before you rub your face. Actually, do this whenever working with spicy things, trust me.
FAQ from My Kitchen (& One from Instagram!)
Can I make these less spicy?
Yep! Take the seeds and membranes out, or swap for red bell peppers. They’ll still look spooky, just not fiery.
Why did my pastry fall off?
Probably wrapped too loosely or too thick—try chilling your wrapped jalapeños for a few mins before baking. Or maybe you just made extra crispy mummies! Happens to the best of us.
Are these gluten-free?
Not with regular pastry—but if you find a GF pastry (I know Minimalist Baker has some ideas), you’re in business. Or skip the pastry if you don’t mind “naked” mummies. A carnival of options.

Where can I get the candy eyes?
I order them on Amazon, or, sometimes, pick them up at Michael’s. No shame in using olive slices if you’re feeling improvisational.
What dip works best?
I like ranch or chipotle mayo, but once I tried blue cheese and… it was divisive. My house, my rules, but you know your crowd!
And if all else fails, just eat the cheese filling with a spoon. No judgment; I’ve definitely done it next to the fridge at midnight (I blame the spirit of Halloween). Oh, before I forget, here’s a good guide on handling hot peppers safely—learned a lot after my accidental jalapeño-eye incident.
Ingredients
- 8 large jalapeño peppers
- 115g (4 oz) cream cheese, softened
- 60g (1/2 cup) shredded cheddar cheese
- 1 clove garlic, minced
- 1/4 tsp smoked paprika
- 1 sheet refrigerated crescent dough (or puff pastry)
- 16 candy eyes (edible candy decorations)
- 1 egg, beaten
- Pinch of salt
Instructions
-
1Preheat the oven to 200°C (400°F) and line a baking sheet with parchment paper.
-
2Cut each jalapeño lengthwise and remove seeds and membranes for less heat. Set aside.
-
3In a bowl, mix cream cheese, shredded cheddar cheese, minced garlic, smoked paprika, and salt until well combined.
-
4Fill each jalapeño half with the cheese mixture.
-
5Unroll crescent dough and cut into thin strips. Wrap strips around each stuffed jalapeño, leaving a gap for the eyes. Brush with beaten egg.
-
6Place on baking sheet and bake for 18-20 minutes until pastry is golden. Cool slightly, then add candy eyes. Serve warm.
Approximate Information for One Serving
Nutrition Disclaimers
Number of total servings shown is approximate. Actual number of servings will depend on your preferred portion sizes.
Nutritional values shown are general guidelines and reflect information for 1 serving using the ingredients listed, not including any optional ingredients. Actual macros may vary slightly depending on specific brands and types of ingredients used.
To determine the weight of one serving, prepare the recipe as instructed. Weigh the finished recipe, then divide the weight of the finished recipe (not including the weight of the container the food is in) by the desired number of servings. Result will be the weight of one serving.
Did you make this recipe?
Please consider Pinning it!!