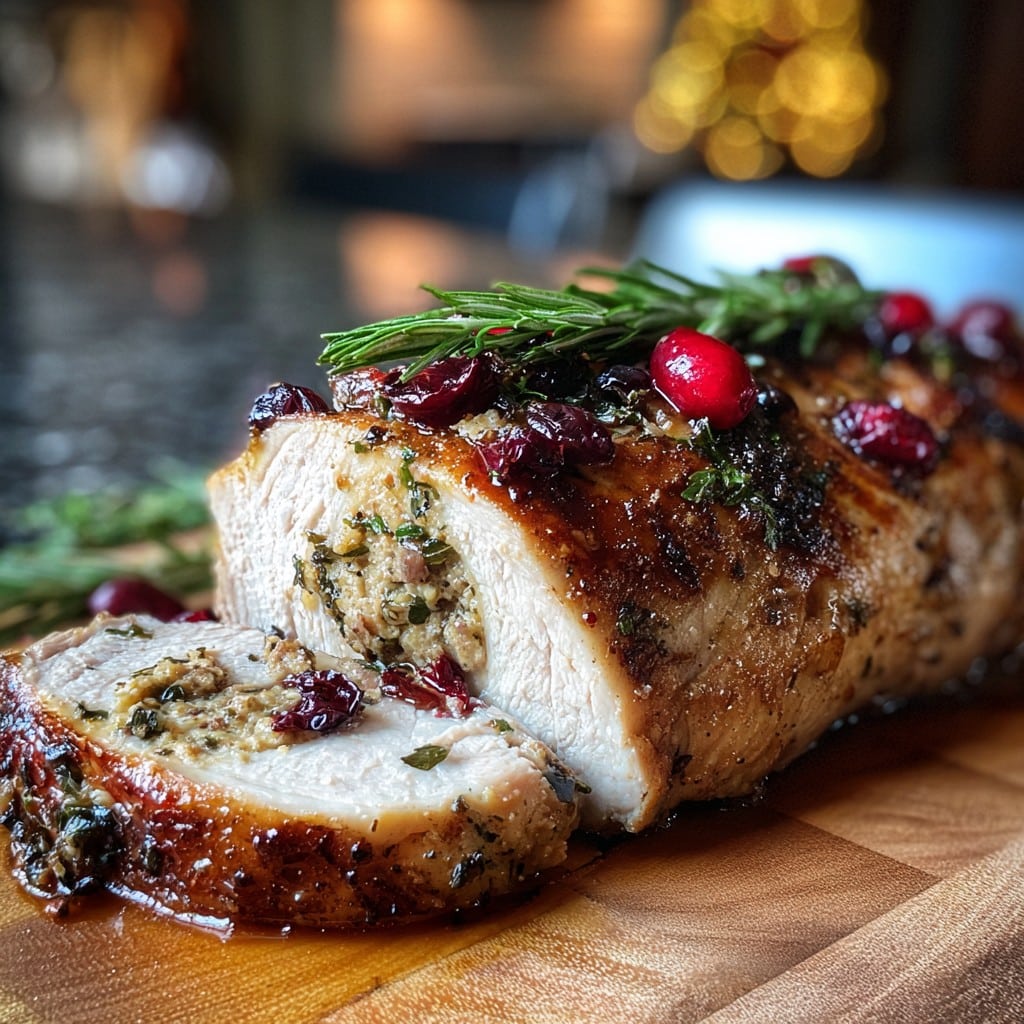
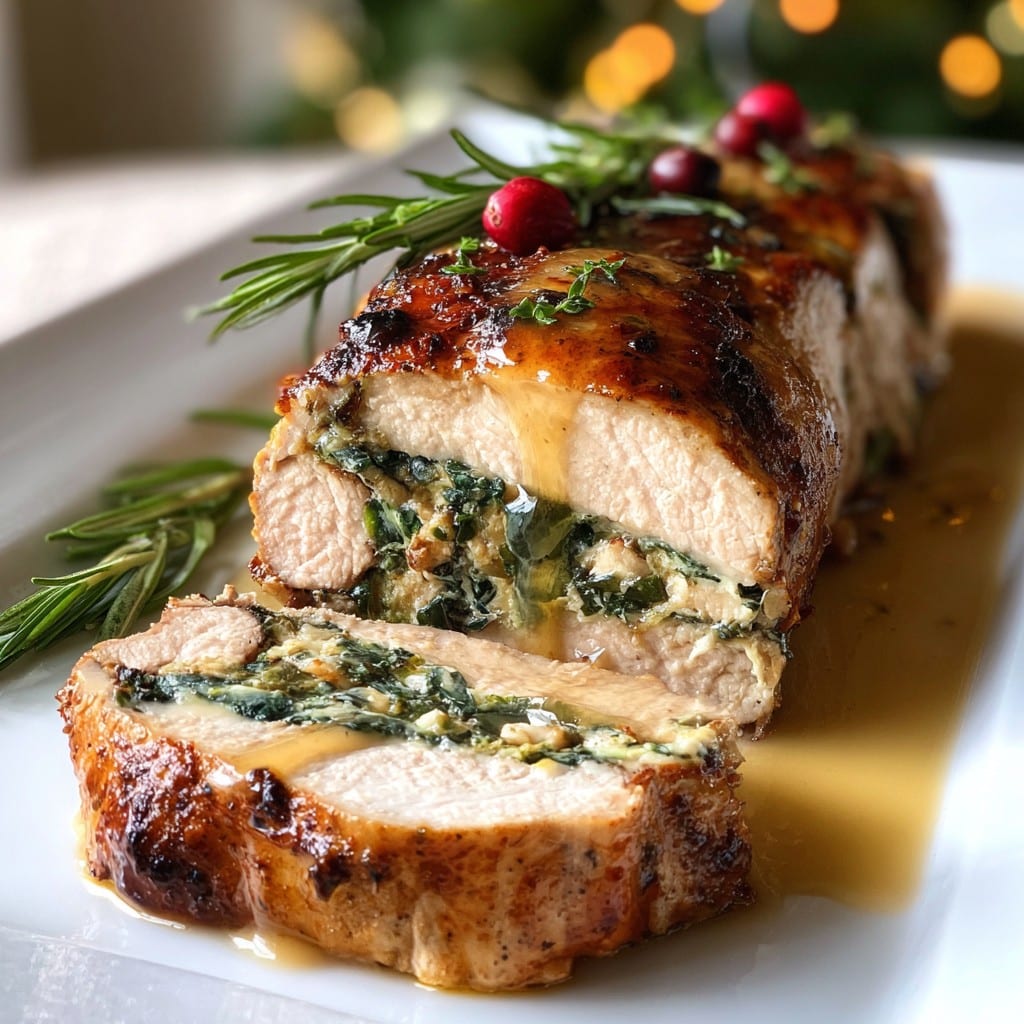
Christmas Stuffed Pork Tenderloin – Festive, Juicy & Crowd-Pleasing
So, What’s the Deal with My Christmas Stuffed Pork Tenderloin?
Hey there! Okay, I have to tell you: this recipe is basically the centerpiece my family expects each Christmas, even if all I want to do is put my feet up and eat cookies. But I’ll admit, the first time I made it, I was so nervous I’d overcook the pork or (gasp!) have stuffing leaking everywhere. Turns out, everyone just thought it looked “rustic” (aka, messy but in a good way).
Seriously, this is the dish that gets people hovering around the oven, sneaking little forkfuls of stuffing when they think I’m not looking. True story: my uncle once “sampled” the whole end piece before dinner. He said he was ‘just making sure it wasn’t dry.’ Uh-huh.
Why You’ll Love This Besides It Being Delicious
I usually break out this stuffed pork tenderloin when I’m kinda tired of turkey (which is every December, honestly) or if I want something that makes folks go, “Ooh, you made that?!” My family goes nuts for the crispy, crackly outside—though if you ask my little cousin, she’d say the stuffing is everything. And you know, it’s forgiving. If you accidentally go a bit heavy on the cranberry or forget to tie it up perfectly, hey, it’s still totally edible (and festive looking, promise). I make this when I want something special but not too fussy—plus, it’s a sneaky way to clear out random cheese bits from the fridge. Don’t tell anyone, though.
Stuff You’ll Need (Ingredients, With a Few Options)
- 2 pork tenderloins (about 500g each—I used to buy the fancy butcher kind, but supermarket ones are fine too, really)
- 1 cup breadcrumbs (sometimes I use smashed up sourdough, or even cornbread crumbs if we have extra, which is rare)
- Half an onion, finely chopped (red onion does the trick if that’s what’s in the veg drawer)
- 2 cloves garlic, smashed and chopped—okay, sometimes I just do one if I’m low energy
- 1/2 cup dried cranberries (or apricots, if you like it sweeter—my gran swears by prunes, no joke!)
- 1/2 cup toasted pecans or walnuts (but hey, skip nuts if there’s allergies)
- 3 tbsp fresh parsley, chopped (dried will work in a pinch, but double it)
- 1/4 cup crumbled feta (goat cheese is lovely too; cheddar, in a pinch, but it melts weird)
- 1 egg (if you forget, trust me, stuffing without is still yummy, just crumblier)
- 2 tsp Dijon mustard (sometimes I use English mustard for a proper kick)
- Salt & pepper—to taste, naturally
- 2 tbsp olive oil (or just use the leftover butter from the stuffing pan for a little extra ooomph)
- Butcher’s string, or, in a bind, go for clean cotton thread (once used twine that sort of smelled like…hardware store. Wouldn’t recommend.)
Here’s How I Throw It Together (Instructions—Kind Of)
- First, preheat that oven to about 400°F (200°C). Not going to lie, sometimes I forget and realize halfway. Don’t stress; it’ll catch up.
- Butterfly your pork tenderloins—meaning: slice them open lengthwise, not all the way through, and spread them out like a book. It will look weird. Flatten them gently with a rolling pin or wine bottle (I use whatever’s handy, honestly).
- Let’s make the stuffing: Sauté your onion (and, if you remember, garlic) in a tablespoon of olive oil for about 4 minutes, medium heat, till soft. Don’t let it burn—trust me, burnt garlic is not festive.
- Mix onion mixture in a bowl with breadcrumbs, cranberries, nuts, parsley, feta, the egg, and that mustard. Give it all a good stir. This is where I usually sneak a taste—mainly for, um, quality control.
- Lay your flattened pork out. Spoon the stuffing down the middle, pretty generously but don’t mound it sky-high.
- Fold the meat back over (just kind of hug it closed). Tie it up in 3-4 spots with butcher’s string or, if desperate, plain cotton thread—the roast will hold together more from sheer willpower than skill, at least the first time.
- Drizzle the top with olive oil, sprinkle on salt and pepper (sometimes I add a bit of rosemary if I’m feeling extra). Place on a baking tray lined with parchment so you don’t have to scrape off burnt bits for ages after dinner.
- Bake for 30–35 minutes. I usually check with a meat thermometer—it should be just a hair under 145°F (62°C). Or, if your thermometer is broken or lost to the messy drawer of doom, make a little slice to check for pinkness.
- Let it rest at least 8 minutes before slicing; otherwise, all the juices run away and sadness ensues. Don’t skip the resting step. Seriously.
- Slice into thick-ish discs and arrange on a platter all fancy, or just pile it up and call everyone to the kitchen—depends on your style.
Stuff I’ve Learned (Notes)
- I once tried stuffing with too much cheese and, well, it all kind of oozed out the ends during baking but nobody complained (they mopped it up with bread).
- If you use apricots, dice them small, otherwise you get big chewy bits that feel like a surprise.
- I think this tastes better the next day, which never happens here, but still.

Experiments I’ve Tried (Variations, Some Actually Good)
- Fresh apple and sage instead of cranberries/nuts for a sort of sweet-savory twist—kids loved it, adults divided. Classic family.
- Once swapped in chorizo for the cheese, thinking it’d be spicy and fun; it sort of overwhelmed everything else, so I stick to herbs and cheese now.
- Gluten-free breadcrumbs work but make it a bit crumbly—just warning you.
You Don’t Need Fancy Gear (Equipment + My Lazy Hacks)
- Baking tray or roasting dish—mine has seen better days
- Butcher’s string or just regular clean cotton thread
- Meat thermometer (I always lose mine and just poke the roast to check doneness)
- Frying pan for the stuffing bits
- Rolling pin—though a wine bottle does the job in a pinch, which is probably how most kitchen gadgets were discovered
Can You Store Leftovers? (Not That We Ever Have ‘Em)
Oh, sure, you can store this—airtight container in the fridge for 2-3 days. Reheat slices in foil in a medium oven or, if you’re like me, just eat cold with mustard at midnight. That said, in my house the leftovers vanish before I can even get lunch out of this. If you somehow have a ton left, it actually works great in a sandwich or chopped up and tossed with pasta (sounds odd, but yum).
What To Serve It With (Family Feuds Ensue)
Personally, I think it’s spot on with roast potatoes and some kind of green veg (never brussels sprouts, sorry Nana). My mum insists on a big slick of cranberry sauce, and my brother once tried it with honey mustard and now that’s his thing. If you’re feeling ambitious, garlic mashed potatoes are excellent, too. For a proper Christmas hit, I’ll recommend my favourite gravy recipe over at BBC Good Food.

Lessons I’ve Learned (Aka, Pro Tips So You Don’t Cry at Dinner)
- Resting the pork after roasting isn’t optional. I once cut into it too soon because everyone was nagging me, and all the juice just ran straight out—dry slices for all. Don’t do it!
- Butterflying the pork is way easier if it’s chilled. Room temp pork is wobbly and hard to cut straight, so I start with it a bit colder than usual—just don’t let it freeze solid.
- Actually, I find it works better if you loosely tent foil over the roast for its rest. Keeps it warm without getting soggy.
Questions People (Actually) Ask Me
- Can I make this ahead?
- Yup! Prep and stuff the pork, keep it wrapped in the fridge for a day. Bring to room temp before baking or you’ll end up waiting forever (learned that the hard way!).
- Do I really need a meat thermometer?
- Technically no, but it saves you from lots of poking and guessing. If you don’t have one, cut into the thickest bit to check if it’s just a tiny bit pink, then rest it—it’ll be perfect (probably).
- What if I can’t find pork tenderloin?
- I’ve used pork loin in a pinch, but it takes longer, and can go dry. So, watch it closer and maybe add extra stuffing (nobody’s ever minded extra stuffing, have they?).
- Can I freeze it?
- Sure, after roasting and slicing is best. Just wrap it up and thaw in the fridge; I’m pretty sure I forgot a slice in the freezer once for 2 months and it was fine, but don’t quote me on that, yeah?
Because Side Quests Are Part of Any Good Recipe
The weird thing is, every time I make this, the dog is convinced something is dropping just for him, so he sits right underfoot the entire time. If you have a canine sous-chef, beware of the snout-of-doom when you’re tying up your roast. Anyway, hope you enjoy this as much as my family does. And if it looks a bit wonky, that’s just extra Christmas character.
Ingredients
- 2 lbs pork tenderloin
- 4 oz Italian sausage, casing removed
- 1/2 cup dried cranberries
- 1/2 cup fresh breadcrumbs
- 1/4 cup chopped fresh parsley
- 2 cloves garlic, minced
- 1 tbsp fresh rosemary, chopped
- 2 tbsp olive oil
- 1/2 tsp salt
- 1/2 tsp black pepper
Instructions
-
1Preheat oven to 375°F (190°C). Butterfly the pork tenderloin by slicing it lengthwise, being careful not to cut all the way through, and open it like a book. Lightly flatten with a meat mallet.
-
2In a skillet, heat 1 tablespoon olive oil over medium heat. Add Italian sausage and cook, breaking up with a spoon, until browned. Stir in garlic, then remove from heat.
-
3In a bowl, combine the cooked sausage, dried cranberries, breadcrumbs, parsley, and rosemary. Mix until well combined.
-
4Spread stuffing mixture over the flattened pork. Roll up tightly and secure with kitchen twine. Rub outside with remaining olive oil, salt, and black pepper.
-
5Place the stuffed tenderloin in a roasting pan. Roast for 35–40 minutes or until internal temperature reaches 145°F (63°C). Let rest for 10 minutes before slicing and serving.
Approximate Information for One Serving
Nutrition Disclaimers
Number of total servings shown is approximate. Actual number of servings will depend on your preferred portion sizes.
Nutritional values shown are general guidelines and reflect information for 1 serving using the ingredients listed, not including any optional ingredients. Actual macros may vary slightly depending on specific brands and types of ingredients used.
To determine the weight of one serving, prepare the recipe as instructed. Weigh the finished recipe, then divide the weight of the finished recipe (not including the weight of the container the food is in) by the desired number of servings. Result will be the weight of one serving.
Did you make this recipe?
Please consider Pinning it!!