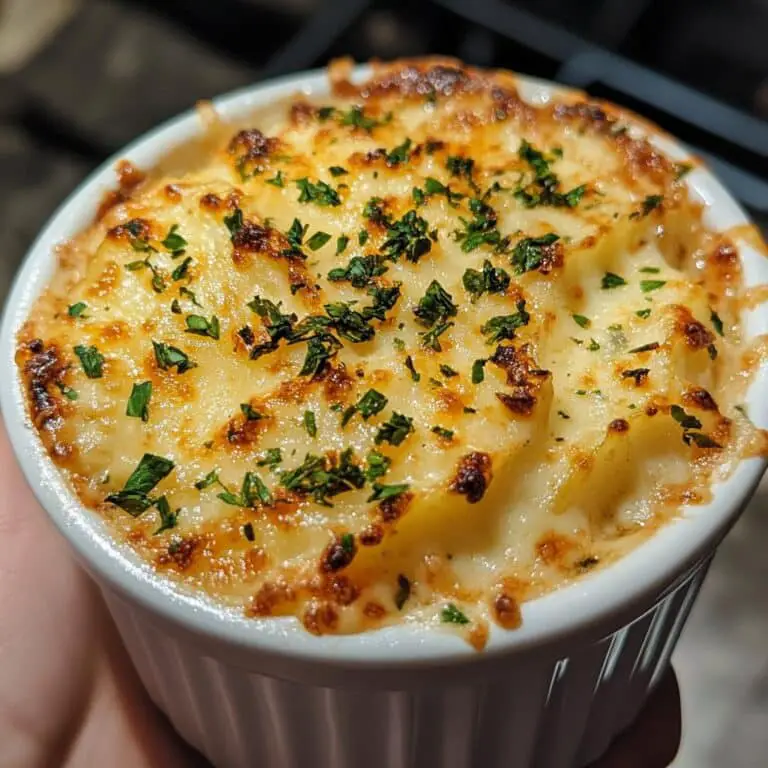
Stuffed Mashed Potato Nests – Simple and delicious recipe
So, Here’s Why I Keep Coming Back to These Nests
You know those recipes that sneak up on you? This is one of those for me. It started as a desperate attempt to use up some leftover mashed potatoes that nobody wanted (blame my brother for the lumpy batch), but somehow these stuffed mashed potato nests became kind of a regular thing. They’re great when you want something comforting, a bit cheesy, and—to be honest—surprisingly forgiving. Last week I made them after a long, rainy Monday and let me tell you, my mood improved about 87 percent by dinner. And if you accidentally overbake them, just slather on some extra sour cream. No one will notice anyway!
Why You’ll Love This (Or at Least, Why We Do)
I make these whenever I want my family to think I put in way more effort than I actually did. My teenagers go wild for the crispy cheesy edges (it’s honestly the only way I can get them to cheer for potatoes), and in the rare event of leftovers—they taste better the next morning, especially if you sneak one cold from the fridge. But here’s the kicker: no matter how messy your mashed potatoes start out, these always find a way to look and taste like you meant to do it all along. And that, my friend, is a win.
Here’s What You’ll Need
- About 3 cups mashed potatoes (leftover ones are fine—even the ones from last night’s takeaway; I sometimes just use instant when I’m lazy—don’t tell anyone!)
- 1/2 cup shredded cheddar (or whatever cheese is lurking in the back of your fridge—I’ve used mozzarella, and once even a random block of Gouda)
- 2 eggs
- 1/2 cup cooked ham or bacon, diced (my grandmother always said smoked sausage is best, but I’m not arguing with free bacon bits)
- 1/4 cup sour cream (or plain yogurt if you’re feeling ~adventurous~)
- 2 green onions, chopped (optional, but it gives it that breakfast-all-day vibe)
- Salt and pepper to taste (if your mashed potatoes were already seasoned, go easy)
- Butter for greasing (or use that weird nonstick spray—it works too!)
How I Actually Make Them (And Sometimes Don’t)
- Preheat your oven to around 200°C/400°F. Actually, sometimes I put it at 180°C because my oven has a mind of its own. Grease a muffin tin—generously. Trust me, you do not want them sticking. A cake tin also works in a pinch, but you’ll just get one mega-nest. Which is kinda fun, come to think of it…
- In a big bowl, mix together your mashed potatoes, cheese, one egg, and a pinch of salt and pepper. This is where I usually sneak a little taste just to make sure the potatoes don’t need more seasoning. (I always end up adding more cheese than I say I will.)
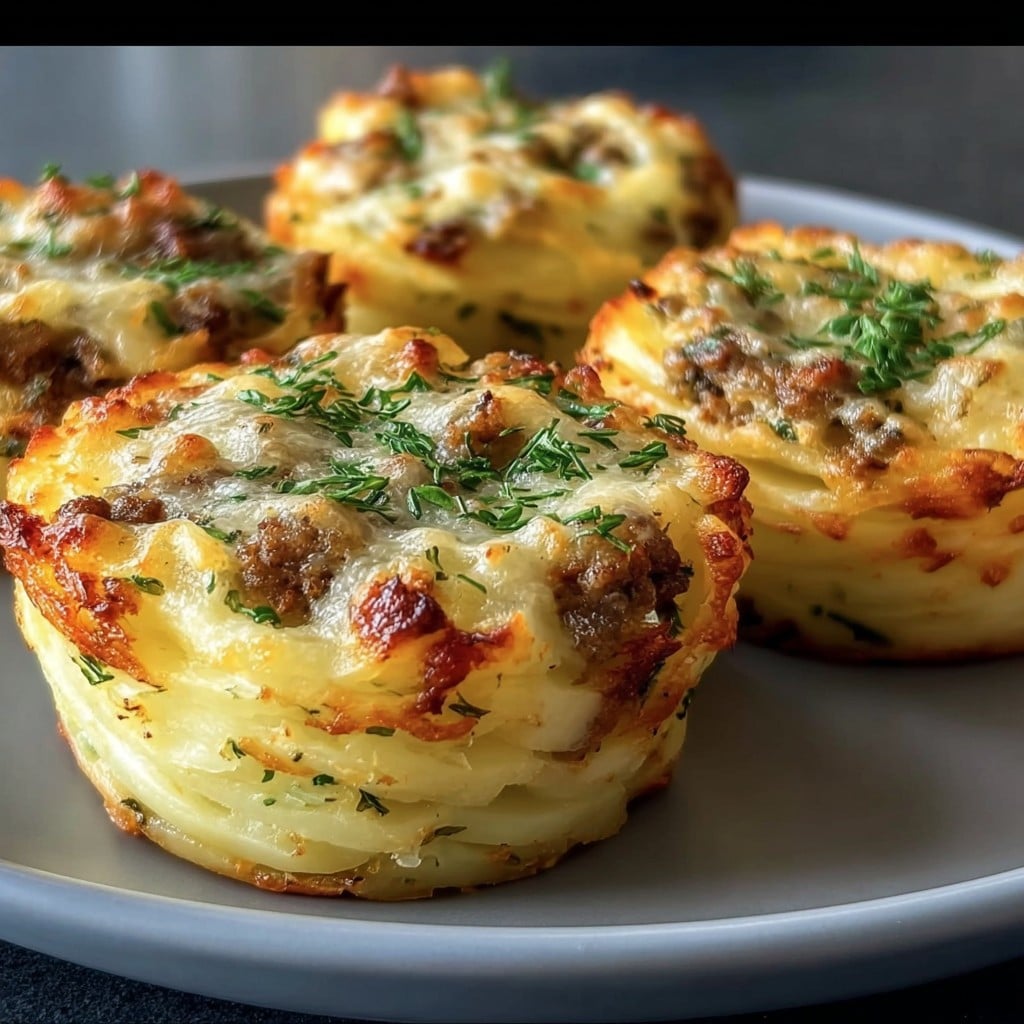
- Scoop about a heaped tablespoon of potato mixture into each muffin cup. Use your fingers or the back of a spoon to make a little well in the center, like you’re making potato bird’s nests. Don’t worry if they look a bit wonky—nesting birds don’t use rulers either.
- Crack the other egg into a bowl, give it a quick whisk, and then mix it up with your diced ham or bacon, sour cream, and green onions. Spoon this filling right into the wells you made.
- Bake for 20—25 minutes or until the edges are going golden and you can’t resist the smell any longer. If the tops look a bit pale, flip the broiler on for a minute (but keep an eye on it, or you’ll be scraping burnt cheese out for days).
- Let ‘em cool for 5 minutes—longer if you value your fingertips. They do hold together better as they cool, but I’ve never had enough patience to wait that long. Use a butterknife to slide around the edges if the nests are shy about coming out.
Stuff I Learned the Hard Way
- If your mashed potatoes were super creamy, add a spoonful of flour to help the nests hold up.
- The more cheese, the crispier the edges get—so don’t be stingy unless you’re lactose-intolerant.
- Use a silcone spatula to scoop them out if you have one; it won’t scratch your tin. Or just go carefully with a butterknife. Don’t sweat it.

Some Variations (and Yes, Not All Were Winners)
- I tried roast veggies as a filling once (it was okay, but kinda mushy—maybe skip the zucchini next time).
- Swap out ham for shredded cooked chicken, or just load up on veggies if you’re going meatless.
- Cheddar isn’t the boss; pepper jack makes them nice and spicy. Or mix in a bit of parmesan (just not too much, or they get salty!).
- Once I tried stuffing them with leftover chili. It… looked worse than it tasted, let’s leave it there.
Kit You’ll Need (Or, Epic Workarounds)
- Muffin tin: crucial for that classic nest shape. Buuut I’ve absolutely pressed these into ramekins or even just plopped big dollops onto a baking sheet once. They won’t look as tidy, but still delish.
- Mixing bowls
- Spoon, fork, or whatever stirs
- Butter knife or spatula (see above for why)

Saving or (Who Am I Kidding) Not Saving Leftovers
Technically, these stay pretty good in the fridge for 2—3 days. I just put them in whatever takeaway container is lying around. But honestly, in my house, they rarely last past breakfast the next day. Reheat in the oven for best results (microwave works but the texture gets a bit odd).
Serving Ideas (What I Like, Anyway)
I usually serve these with a squeeze of ketchup, but my partner likes a big scoop of canned baked beans (yes, it’s a British thing). For a party, make a platter and watch them disappear faster than chips at a pub. Sometimes I add a bowl of rainbow slaw on the side—something with crunch to balance out the potato-y comfort.
Pro Tips After a Few (Many) Mishaps
- Don’t try to skip the greasing step—one time I was hasty and lost half my batch to the muffin tin gods.
- Take an extra minute to make proper wells in the nests. I used to rush this part, and the filling would escape everywhere (still tasted fine… just messy).
- If you like crispy bits (me, always) bake a minute or two longer. Watch them, though!
Questions Real Folks Have Asked Me
Can I freeze these?
Sort of. You can freeze them (once cooled) in a container and reheat from frozen, though the texture’s a bit off—especially if the potatoes are on the soft side. Still edible though!
Can I make these with instant mashed potatoes?
Yep, I do this all the time if I’m feeling lazy. Use a bit less liquid than the box says, so they’re thicker.
What can I use instead of ham or bacon?
Just about anything—leftover cooked sausage, roasted red peppers, or skip the meat entirely. My veggie pal loves them with caramelized onions and mushrooms. There’s a good veggie swap idea on Love & Lemons if you’re hunting more ideas.
Why did my nests fall apart?
Usually it’s because the potatoes were too soft or you didn’t let them cool a few minutes before taking out. Or maybe they just needed a bit more cheese (I mean, that’s true for most things in life).
Is it normal for the filling to bubble over?
Oh, totally. I just scrape it up and eat it off the tin—no shame in that! Makes for a crunchy snack while you wait.
If you want to see other people’s kitchen successes (and fails) with potato nests, check out some community photos on Reddit’s r/food—really makes you feel like you’re in good company when things go sideways!
And that’s it! Give it a whirl, and let me know if you discover any weirdly brilliant filling ideas. Sometimes trying something odd is how you find your next favorite, yeah?
Ingredients
- 4 medium russet potatoes, peeled and cubed
- 2 tablespoons unsalted butter
- 1/4 cup milk
- 1/2 teaspoon salt
- 1/4 teaspoon black pepper
- 1/2 cup shredded cheddar cheese
- 1/4 cup cooked sweet corn kernels
- 1/4 cup finely diced bell pepper
- 2 tablespoons chopped fresh parsley
- 1 large egg
Instructions
-
1Preheat your oven to 400°F (200°C). Grease a muffin tin with cooking spray or butter.
-
2Boil the cubed potatoes in salted water for about 15 minutes until fork-tender. Drain and return to the pot.
-
3Mash the potatoes with butter, milk, salt, pepper, and egg until smooth and well combined.
-
4Spoon the mashed potatoes into the muffin tin, using a spoon to create a nest shape with a hollow center.
-
5In a small bowl, mix together cheddar cheese, corn, and bell pepper. Fill each potato nest with the cheese and vegetable mixture.
-
6Bake for 25-30 minutes or until the nests are golden brown. Remove from oven, garnish with parsley, and serve warm.
Approximate Information for One Serving
Nutrition Disclaimers
Number of total servings shown is approximate. Actual number of servings will depend on your preferred portion sizes.
Nutritional values shown are general guidelines and reflect information for 1 serving using the ingredients listed, not including any optional ingredients. Actual macros may vary slightly depending on specific brands and types of ingredients used.
To determine the weight of one serving, prepare the recipe as instructed. Weigh the finished recipe, then divide the weight of the finished recipe (not including the weight of the container the food is in) by the desired number of servings. Result will be the weight of one serving.
Did you make this recipe?
Please consider Pinning it!!