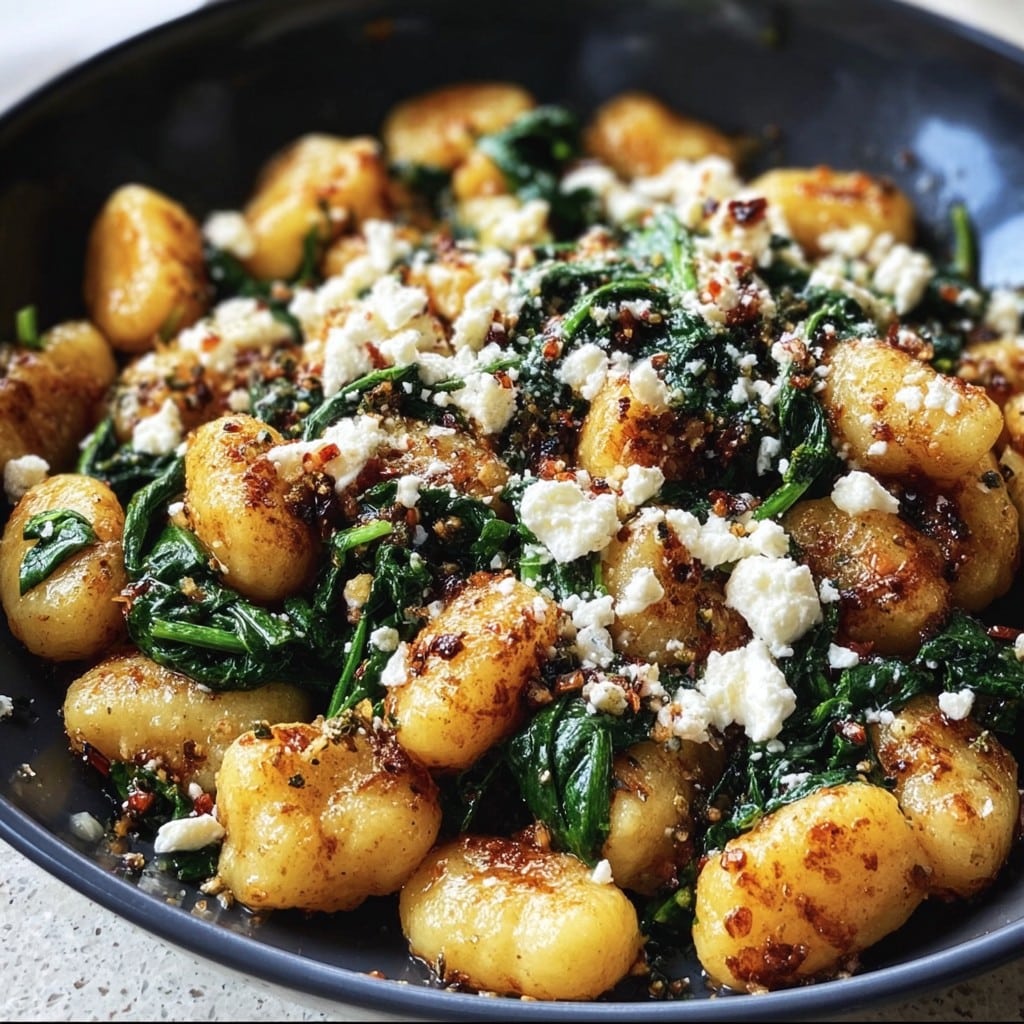
Weeknight Crispy Gnocchi with Spinach – Comfort Food Made Easy
If you’d told me a few years ago I’d be pan-frying gnocchi instead of just boiling it like I learned from my mum (who, to be fair, usually chose the quickest route to get dinner on the table after work), I’d have probably made a face. But one random Thursday, out of pure kitchen boredom, I tried crisping those doughy little pillows up in a skillet. Wow. My son called it ‘potato popcorn’ and I kinda haven’t gone back since. Now, whenever I need something super heart-warming but only have, say, 25 minutes and a rapidly wilting bag of spinach, this crispy gnocchi ends up on the menu. The only disaster was once using shelf-stable gnocchi ages past its best by date. Trust me: don’t.
Why I’m Slightly Obsessed With This Gnocchi
I make this, honestly, when I’m running on fumes and only the thought of comfort food will do. Also, my family inhales it—no leftovers is a real possibility. There’s something magic about that contrast between golden, crisp outsides and soft, pillowy centers (and yes, it’s incredibly satisfying to eat with just a fork curled up on the couch, no judgement here). This is the kind of dinner I’d put up against a takeout night any day. Plus, we all know the pain of leftover spinach—this actually makes it disappear in the best way. Oh, and impatient people (me, most days) will really appreciate how you barely need to fuss over it.
The Not-Fussy Ingredients
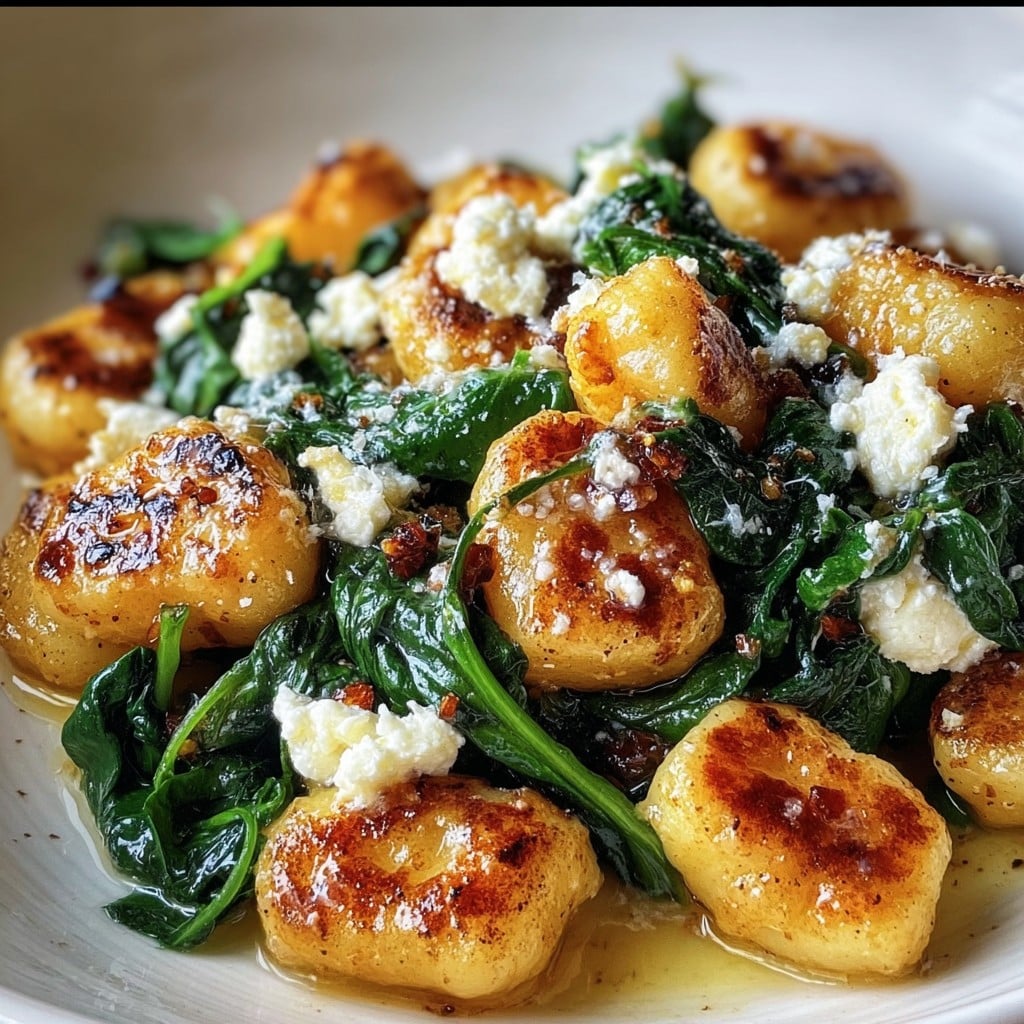
- 500g (or just a standard pack) potato gnocchi (shelf-stable is what I have most, but fresh/‘authentic’ is great when my local shop bothers to stock it—my gran used to insist on a fancy Italian brand, but honestly, any will work!)
- 2-3 good handfuls of baby spinach (I’ve also chucked in arugula when I was desperate)
- 2-3 tbsp olive oil (sometimes I go wild and use butter for a bit richer flavor)
- 3 cloves garlic, squashed and roughly chopped (no shame if you use jarred!)
- Salt and pepper—to taste
- Parmesan or pecorino cheese, for sprinkling on top (no quantity given, because who really measures cheese?)
- Optional: a squeeze of fresh lemon juice or a bit of chili flakes if you like things peppy
Here’s How We Make It (With Wiggle Room)
- Heat the oil (or butter/oil combo—actually, I find it works better with both if you want to try) in a big, nonstick frying pan over med-high. When it shimmers, toss in the gnocchi straight from the package (no boiling required, promise). This is where my mind was blown the first time.
- Let them sit a bit to get color; don’t poke at them too much or they won’t crisp! Give them a shake or flip after 2-3 mins—when the bottoms are golden brown, flip or gently toss again. It’s not as scary as it sounds. (Don’t worry if some stick, happens to me too. They’ll loosen up with a nudge.)
- Once most sides are crispy-looking (7ish minutes total), add the garlic. Stir it around for a minute so it doesn’t burn (I always get distracted here—it’s okay if it’s a bit brown, just not totally burnt).
- Tumble in your spinach—it’ll look like a bit too much but trust me, it all wilts down. Stir till just wilted and glossy. Toss in salt and plenty of pepper. If it looks a tad dry, drizzle a bit more oil or even a splash of water in there.
- Sprinkle on all the parmesan or other cheese, plus lemon juice or chili if you fancy. Taste (this is where I usually sneak a few gnocchi–but don’t burn your tongue like I always do).
- Serve hot, preferably right away before the crispy magic fades. But honestly, I’ve eaten leftovers fridge-cold and liked it…
Lived-and-Learned Notes For Next Time
- If you’re in a huge hurry, use pre-washed bagged spinach; saves you faffing with stems and rinsing.
- Once I tried adding sun-dried tomatoes. Surprise: too salty (for me, anyway) but you might like it!
- Don’t skimp on the oil or butter—dry gnocchi just isn’t it.
- Once my pan wasn’t hot enough, and the gnocchi came out kinda soggy rather than crispy. Not the vibe I wanted, so now I always preheat properly.

If You Want to Mix It Up
- Swap spinach for kale or chard (takes a bit longer to wilt; you can cut it up smaller).
- Bacon bits or pancetta—delicious, though it stops being vegetarian (and be careful with the extra salt!).
- Throw in a handful of frozen peas or broad beans—adds color but can cool things down fast, just cook a smidge longer.
- I once tried a blue cheese sprinkle, hoping for fancy pub vibes—no one in my house liked it except me. Oh well.
Kit You’ll Need (Sort Of)
- Big nonstick skillet (but if you’ve only got a normal frying pan, just use a bit extra oil and keep scraping with a spatula—don’t panic if it sticks a bit, I’ve made it work plenty of times)
- Wooden spoon or spatula—nothing too fancy

How to Store It (If You Even Need To)
If there are leftovers (it’s rare in my house, ha), pop them in an airtight box in the fridge. Honestly, it stays pretty tasty for up to two days, but the crispy edges mellow out quite a bit. Sometimes I reheat it in a pan with a splash of water or, if I’m lazy, just microwave gently. Not quite as glam, but good enough on a busy lunch. Freezer? I suppose you could, but it comes out a bit mushy. I wouldn’t bother.
Serving Ideas—I Play Favorites
This is good enough as a meal by itself (I always eat mine straight from the pan if I’m home alone, shh). But for a proper dinner table setup: add a sharply-dressed green salad, some crusty bread for wiping up the garlicky bits (my dad always demanded this), or a fried egg plopped right on top—that’s my partner’s favorite, and I begrudgingly admit it’s kind of brilliant.
Lessons I’ve Learned (the Hard Way)
- Don’t crowd the pan or the gnocchi will steam instead of crisp—trust me, I tried to be clever once and it was a soggy mess.
- Keep your eye on the garlic; it goes from ‘fragrant’ to ‘incinerated’ in a blink. If it gets bitter, there’s no saving it.
- I once tried rushing the initial crisping to save a few minutes. Regretted it because they just came out chewy, which isn’t what anyone wants. Give it time!
Real-Life Gnocchi Questions I Keep Getting
- Can I use gluten-free gnocchi? Sure! Some brands hold up better than others, though. I’d check reviews—I often browse threads on Reddit’s r/Cooking for gluten-free swaps that actually work, if you’re curious.
- Does it work with frozen gnocchi? Oh, totally. Just defrost first, or they spit like mad in hot oil. Voice of experience there.
- Do I have to use spinach? Nope, any leafy green will do. Chard is a bit wan, but still good. I dunno why, but spinach just disappears into the dish in the best way (plus, I always seem to have it lurking in the fridge).
- Best way to make it cheese-free? Leave out the parm, maybe sprinkle on some toasted seeds or nutritional yeast? My vegan friend swears by the Minimalist Baker’s nut parm on this!
- Can kids help make this? Yes—though the hot oil part is for grown-ups. Mine like tossing in the spinach and cheese at the end. Less messy than baking, for sure.
- Digression time: I once tried to get my cat interested in a stray gnocchi, thinking she’d be as food-obsessed as I am. Nada. She wouldn’t even sniff it. I suppose that says more about her standards than my cooking?
Ingredients
- 1 lb (450g) shelf-stable gnocchi
- 3 tbsp olive oil, divided
- 3 cloves garlic, minced
- 5 oz (140g) fresh baby spinach
- 1/2 tsp crushed red pepper flakes (optional)
- 1/3 cup grated parmesan cheese, plus more for serving
- Salt and black pepper, to taste
- 1 tbsp unsalted butter
Instructions
-
1Heat 2 tablespoons of olive oil in a large nonstick skillet over medium-high heat.
-
2Add the gnocchi to the skillet in a single layer and cook, undisturbed, for 3-4 minutes until golden and crispy on one side. Stir and continue cooking for another 3-4 minutes, until browned all over.
-
3Push the gnocchi to the side of the pan. Add remaining olive oil and the minced garlic; cook for 30 seconds until fragrant.
-
4Add the baby spinach and red pepper flakes (if using) to the skillet. Toss with gnocchi until spinach is wilted, about 2-3 minutes.
-
5Stir in the butter and parmesan. Season with salt and black pepper. Toss to coat well and serve immediately, topped with extra parmesan if desired.
Approximate Information for One Serving
Nutrition Disclaimers
Number of total servings shown is approximate. Actual number of servings will depend on your preferred portion sizes.
Nutritional values shown are general guidelines and reflect information for 1 serving using the ingredients listed, not including any optional ingredients. Actual macros may vary slightly depending on specific brands and types of ingredients used.
To determine the weight of one serving, prepare the recipe as instructed. Weigh the finished recipe, then divide the weight of the finished recipe (not including the weight of the container the food is in) by the desired number of servings. Result will be the weight of one serving.
Did you make this recipe?
Please consider Pinning it!!